

The Complete Guide to Essential Browser Settings

No matter what browser you use and no matter what you use it for, there are some essential browser settings that can make your browsing experience better. From maintaining your privacy to enhancing your browsing experience to removing old, troublesome extensions, this guide goes over the key browser settings that everyone should know.
 Photo: Jacob Bobo
There are many different browsers out there, but in this guide we’ll focus on the three key ones for Windows users: Google’s Chrome, Mozilla’s Firefox, and Microsoft’s Edge. Many alternative browsers are based on these key designs, so if you have a Chromium alternative like Brave or Vivaldi, then the standard Chrome instructions should be applicable.
How to delete browsing history
What you do in your web browser is your business, but if you forgot to enable private mode, or want to clear that link you accidentally clicked, you need to know how to delete your browsing history.
Chrome
Source: Jon Martindale
- Open Chrome and select the three-dot menu in the top-right of the window.
- Select Settings at the bottom of the list.
- Select Privacy and security from the left-hand menu.
- Under the heading, “Privacy and security,” Select Delete browsing data.
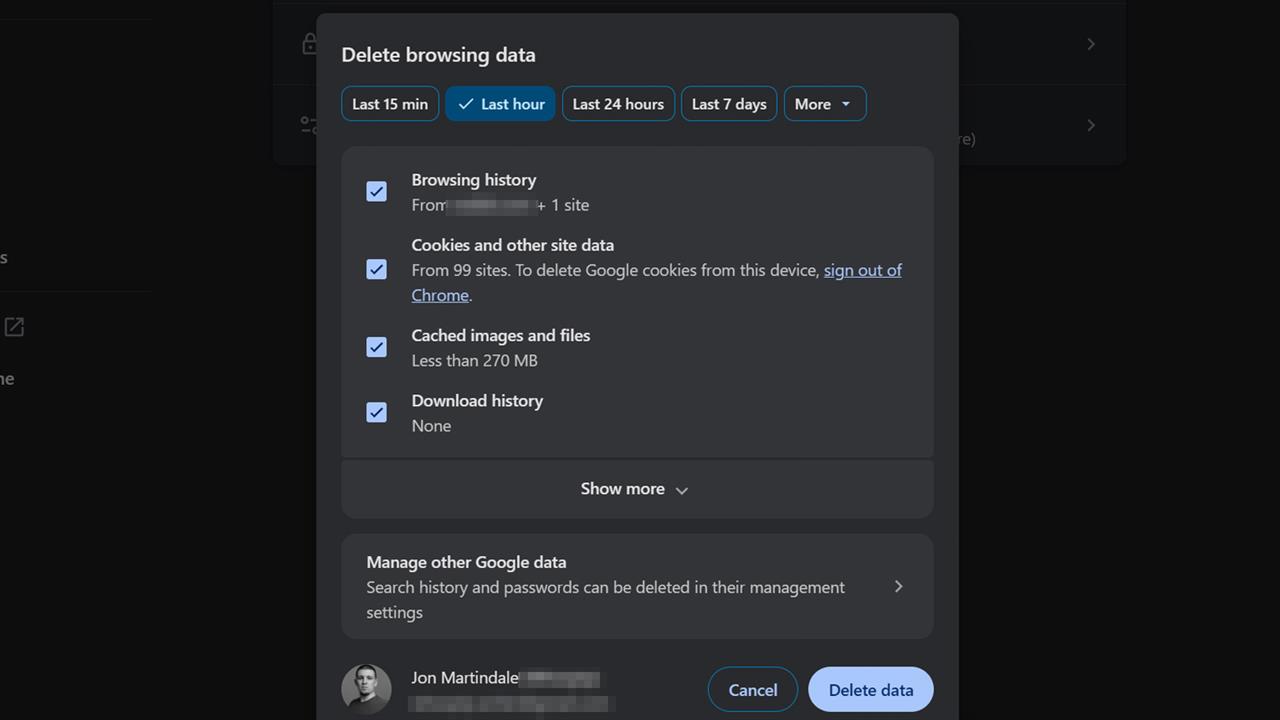
- A list of options for what kind of browsing data to delete will appear. If deleting browsing history, ensure Delete Browsing History is ticked. Tick any other boxes for additional data to be removed, such as download history, browser cookies, and cached images. Select Show more at the bottom of the window for more options.
- Use the timescale options at the top of the window to select how far back data should be deleted. Options include the last 15-minutes, the last 24 hours, or if the “More” drop-down is clicked, up to All time can be selected, to remove everything done on this PC’s web browser.
- When ready, select Delete data to remove browsing history (and anything else selected) from the system.
- Note: if logged in with your Google account, and the box is checked, it will delete all history across ALL devices, not just the current one!
Firefox
Source: Jon Martindale
- Open Firefox and select the three-line menu in the top-right of the window.
- Select Settings near the bottom of the list.
- Select Privacy and Security from the left-hand menu.
- Under the heading, “History,” Select Clear history.
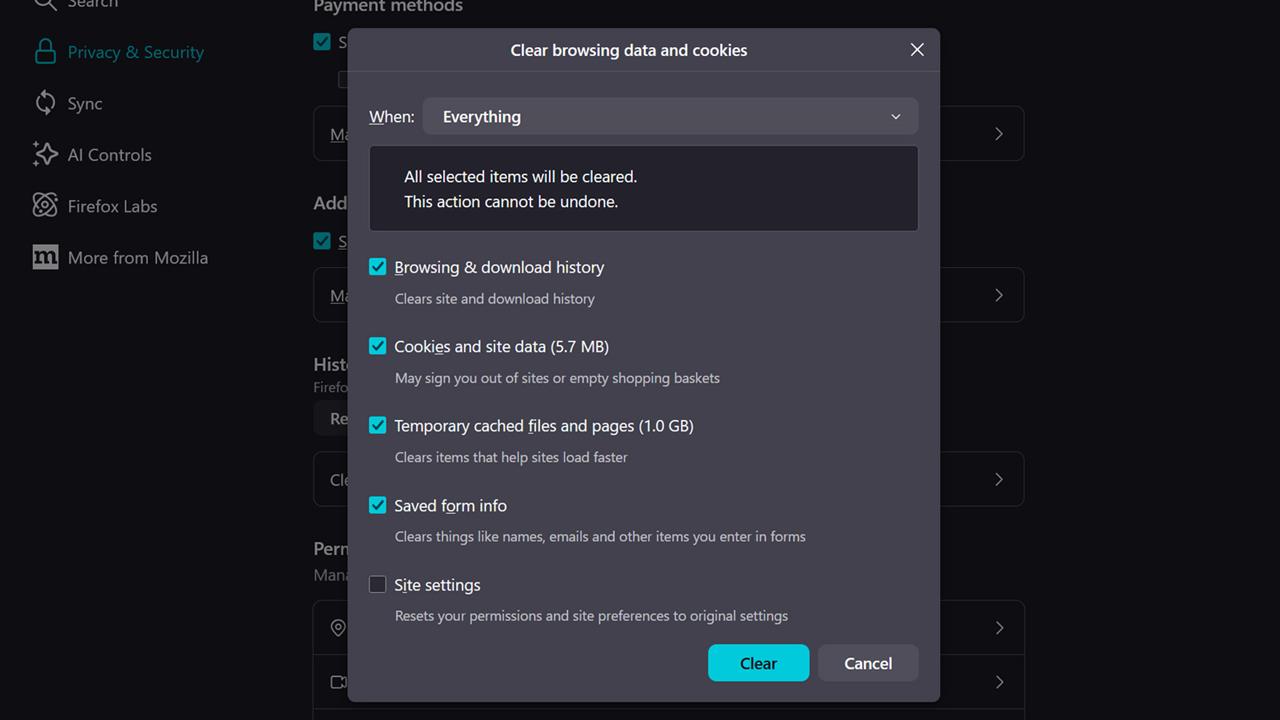
- A list of options for what kind of browsing data to delete will appear. Ensure Browsing and download history is ticked. It can also clear cookies, cached files, and other site settings – just tick the appropriate boxes.
- Use the “When” drop-down box to select the deletion timescale; from a minute or two all the way to everything.
- When ready, select the Clear button to remove browsing history from Firefox.
- Alternatively, Firefox can be set to never record browsing history, even outside of privacy mode. Just navigate to Settings > Privacy and Security > History, and using the drop-down menu select Never remember history.
Edge
Source: Jon Martindale
- Open Edge and select the three-dot menu in the top-right of the window.
- Select the Settings cog icon at the bottom of the list.
- Select Privacy, search and services from the left-hand menu.
- Under the heading, “Privacy, search and services,” Select Clear browsing data.
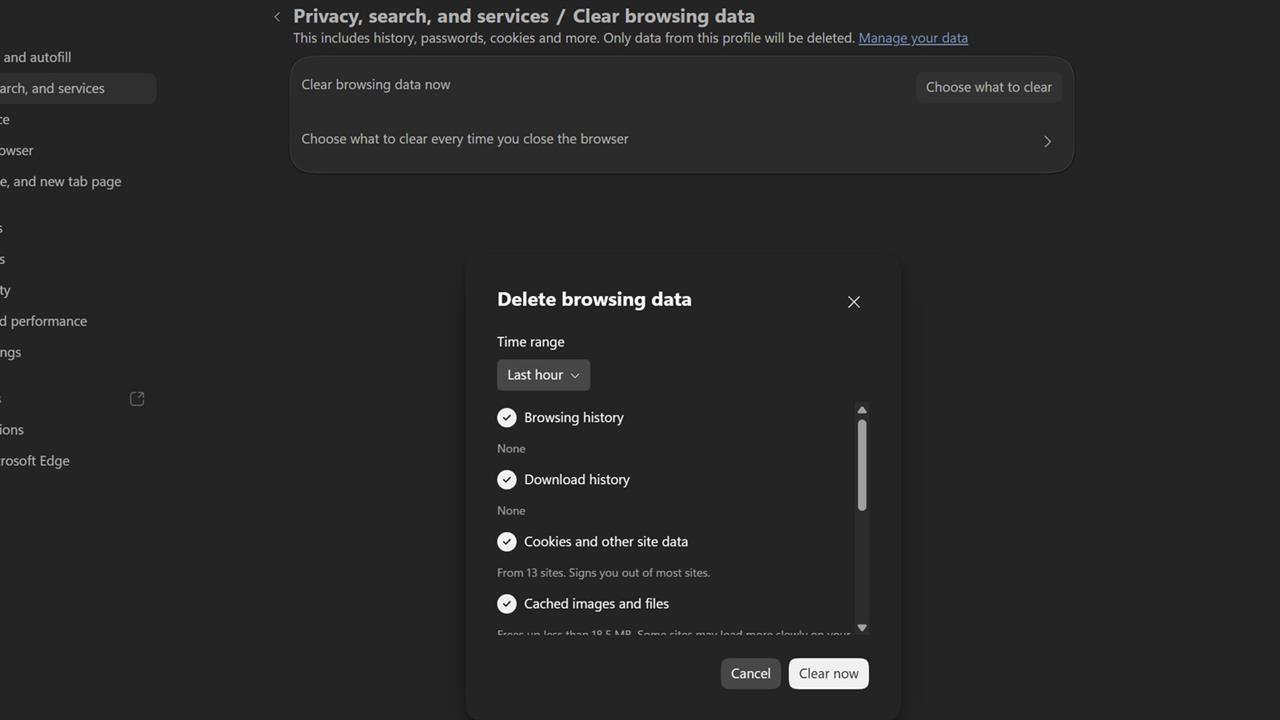
- Next to “Clear browsing data now,” select Choose what to clear.
- From the list of options, select Browsing history, and any other browser settings and data to be removed.
- Use the “Time range,” options at the top of the window to select how far back data should be deleted. Select All time to remove everything done on this PC.
- When ready, select Clear now to remove browsing history (and anything else selected) from the system.
- Edge can also delete that data every time it’s closed; simply select Choose what to clear every time you close the browser in the Privacy, Search and Services menu to automatically delete browsing history when the browser is closed.
How to import bookmarks
If you’re moving from one browser to another, importing your bookmarks is a great way to make the new browser feel like home. It makes sure all your most important shortcuts are right there where you need them, no matter what browser you’ve moved from.
Chrome
Source: Jon Martindale
- Open Chrome and select the three-dot menu in the top-right of the window.
- Select Bookmarks and lists from around the middle of the menu.
- Select Import bookmarks and settings.
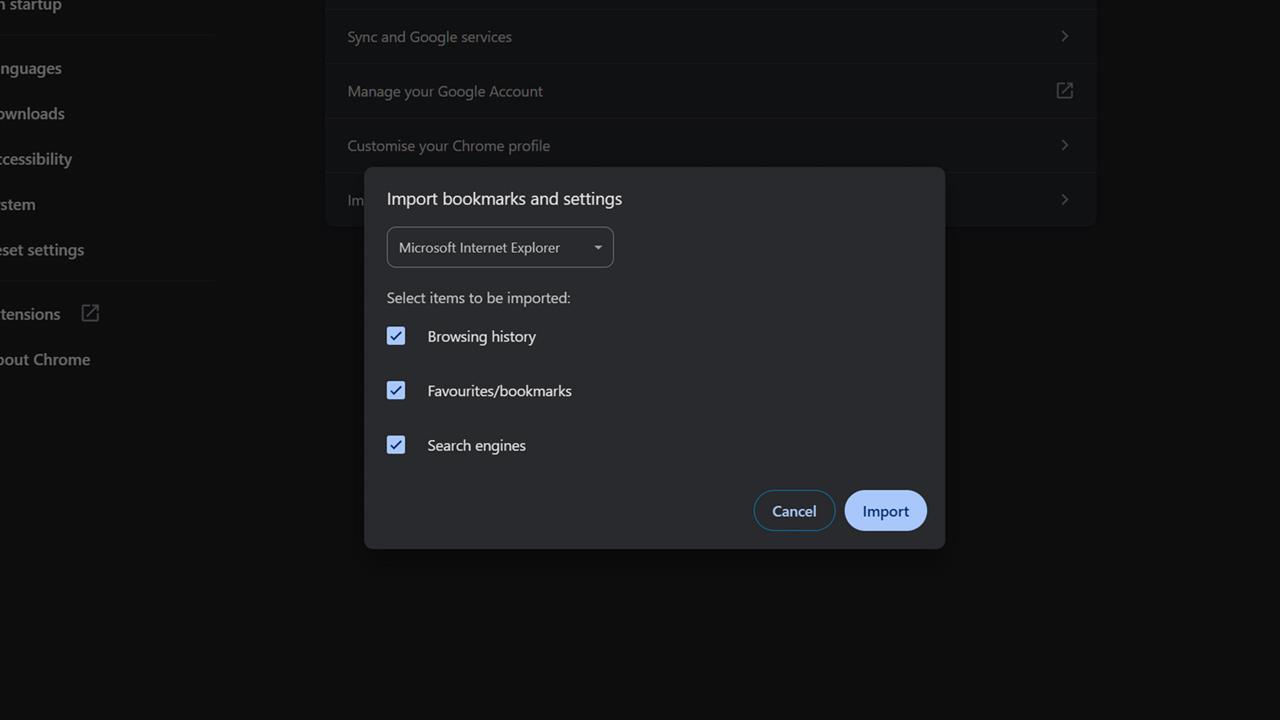
- In the new window that appears, use the drop-down menu to select the browser that bookmarks will be imported from.
- Using the tick boxes, toggle whether browsing history and search engines should also be brought over.
- When ready, select Import.
Firefox
Source: Jon Martindale
- Open Firefox and select the three-line menu in the top-right of the window.
- Select Settings from the list.
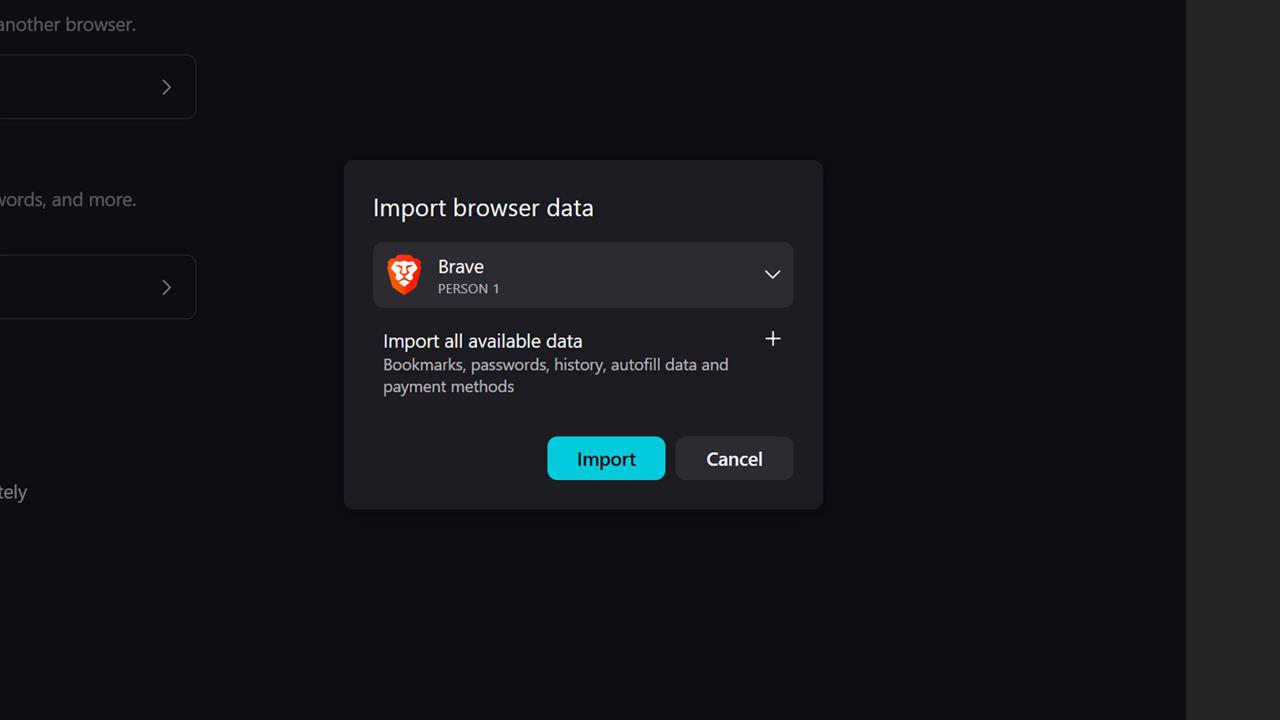
- Under the heading “Import browser data,” select Import Data.
- Use the drop-down menu to select which browser to import the bookmarks from.
- Select the + icon next to “Import all available data,” to select the relevant data to import, including Bookmarks.
- When ready, select Import.
Edge
Source: Jon Martindale
- Open Edge and select the three-dot menu in the top-right of the window.
- Select Settings from the list.
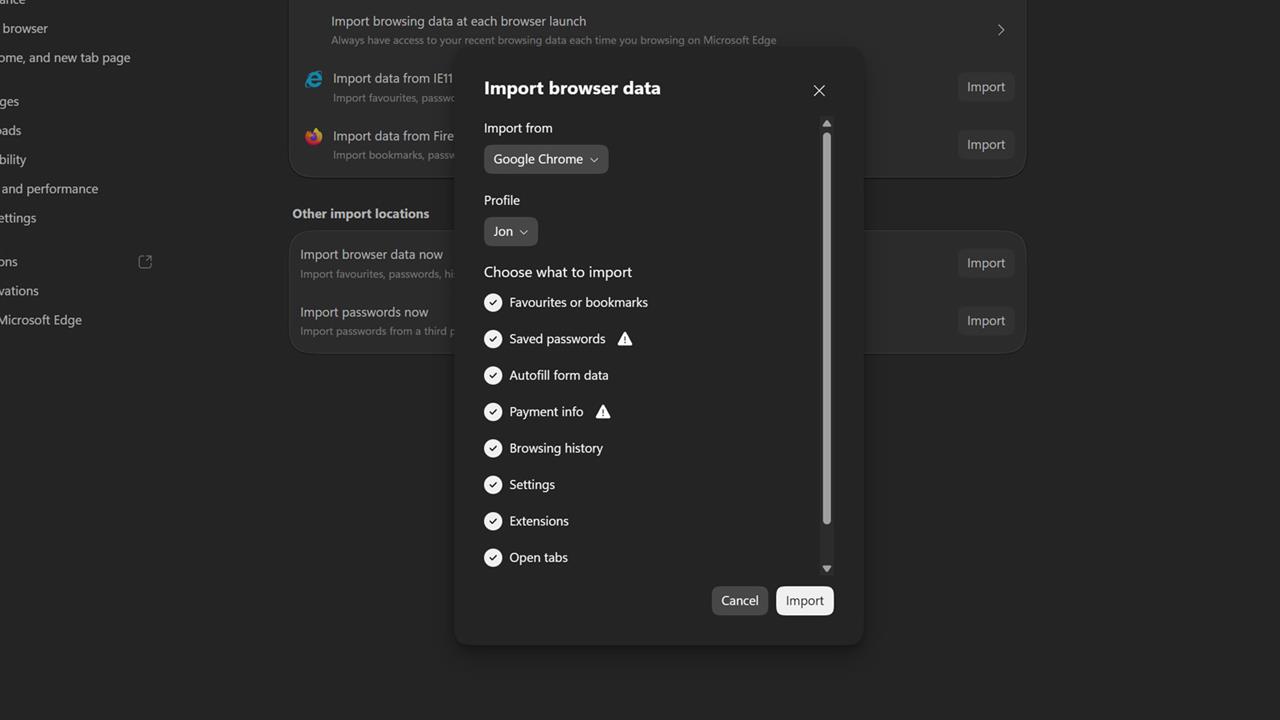
- Under the heading “Profile settings,” select Import browser data.
- Use the drop-down menu to select which browser to import the bookmarks from.
- Select Import next to the chosen browser.
- Use the toggles to select Favorites or bookmarks, and any other elements to be imported to Edge.
- When ready, select Import.
How to remove extensions
Extensions are a great way to augment the capabilities of your browser. But if you aren’t using old ones, or just want to thin the number of icons in your browser window, here’s how to remove them.
Chrome
Source: Jon Martindale
- Open Chrome and select the three-dot menu in the top-right of the window.
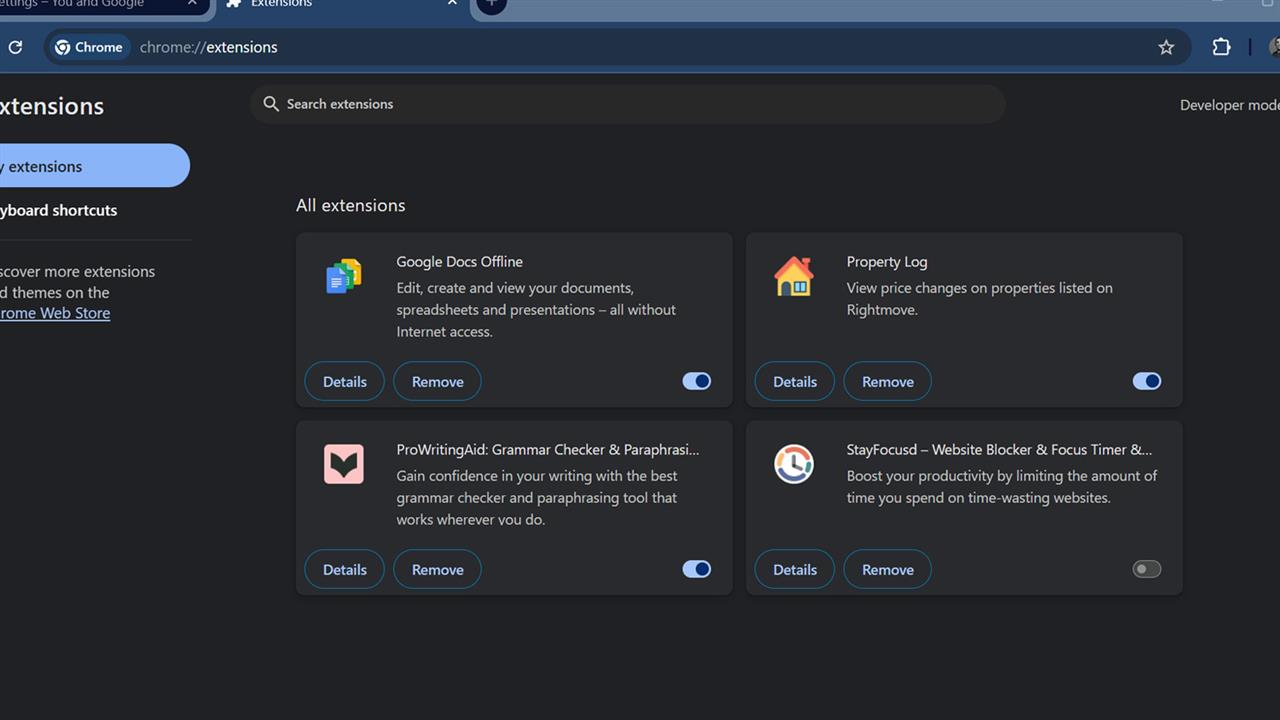
- Select Extensions then Manage extensions.
- Under the heading All extensions locate the extension(s)to be removed, and select Remove next to them. Repeat this for any other extensions to be removed.
Firefox
Source: Jon Martindale
- Open Firefox and select the three-line menu in the top-right of the window.
- Select Extensions and themes.
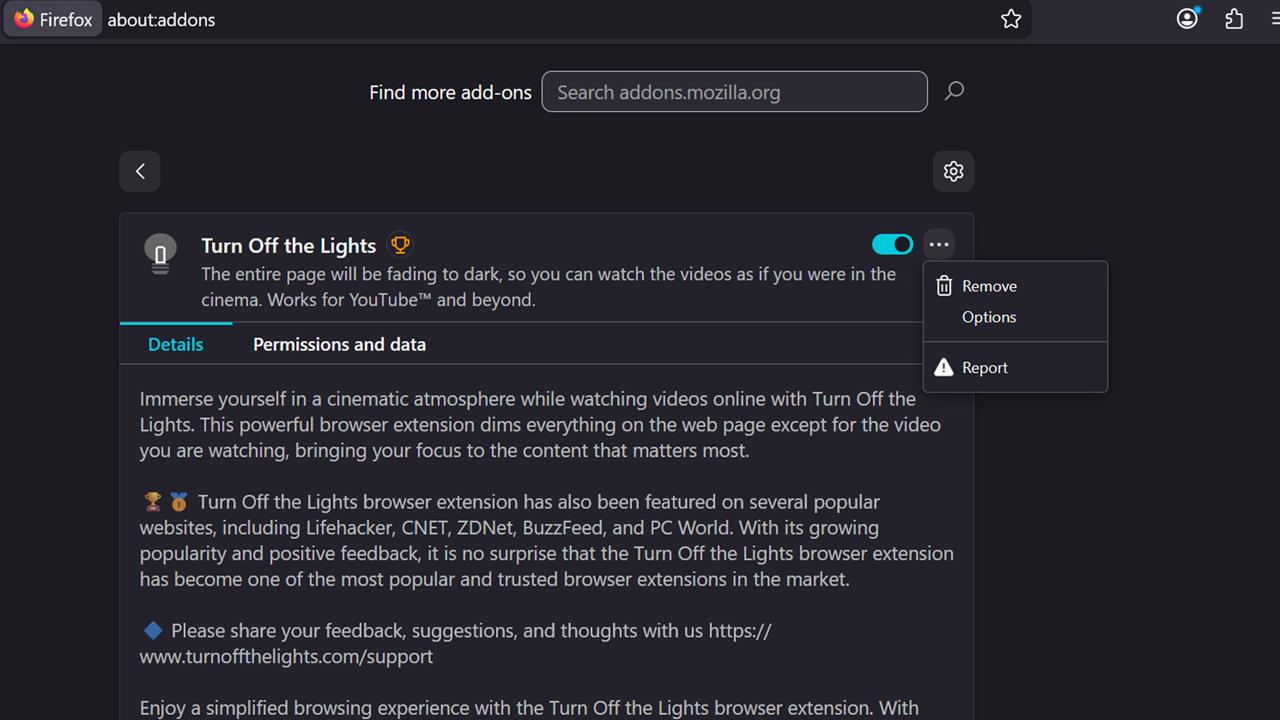
- Under the heading Personalize Your Firefox, locate the extension(s) to be removed. Select Manage next to one of them.
- Extensions and add-ons can be disabled by selecting the toggle button on the right of the extension. Alternatively, select the three-dot menu followed by Remove to remove the extension entirely.
- Repeat the above for every extension to be removed or disabled.
Edge
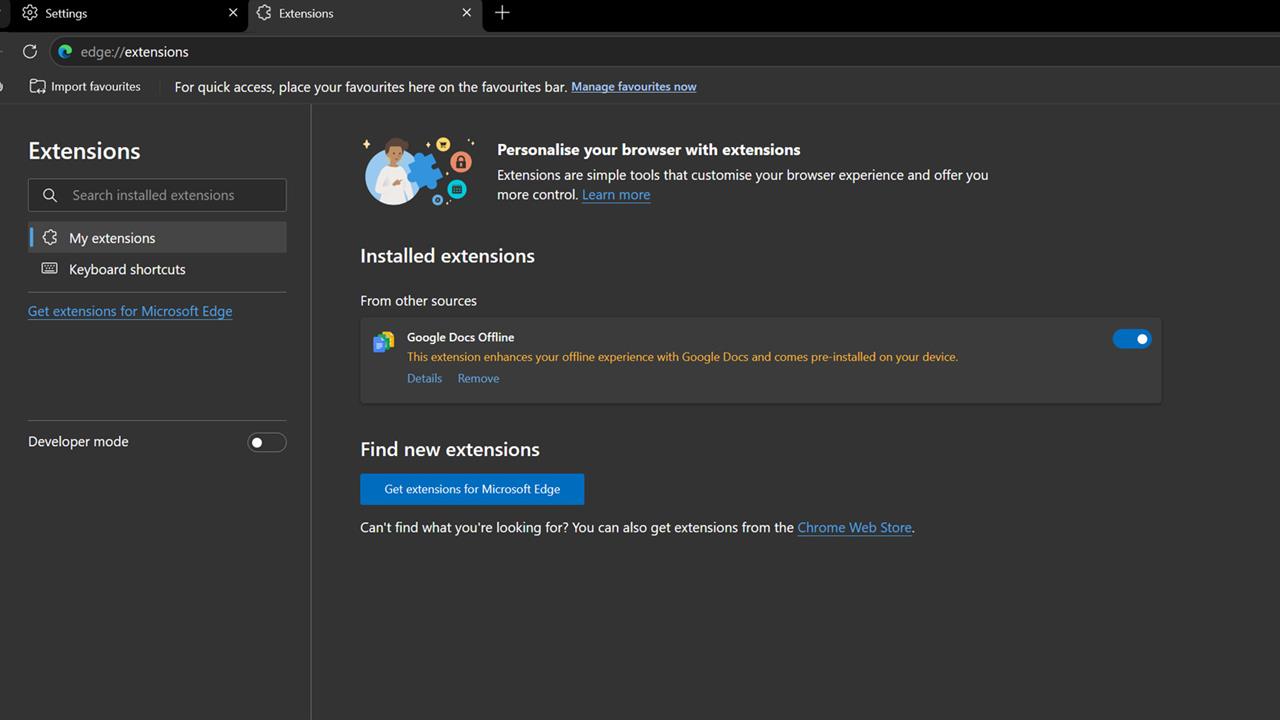
Source: Jon Martindale
- Open Edge and select the three-dot menu in the top-right of the window.
- Select Extensions then Manage extensions.
- Under the heading Installed extensions, locate the extension(s) to be removed, and select Remove next to them. Repeat this for any other extensions to be removed. To disable an extension instead, the toggle can be used to turn it off temporarily.
How to enable Private Browsing
Private browsing won’t obscure your browsing activities from the websites you visit, your internet service provider, or any relevant authorities who are interested in what you’re doing online. To prevent that, you need a VPN. But to stop your own system from recording what you’ve been viewing online, Private Browsing is a good way to enhance your privacy.
Chrome
- Open Chrome and press Ctrl + Shift + N. Alternatively, select the three-dot menu in the top-right, then select New Incognito window.
Firefox
- Open Firefox and press Ctrl + Shift + P. Alternatively, select the three-line menu in the top-right, then select New Private Window.
Edge
- Open Edge and press Ctrl + Shift + N. Alternatively, select the three-dot menu in the top-right, then select New InPrivate window.
How to add a Home Button
Web browsers don’t all include a home button as standard, but it’s a useful way to get back to a new tab or your preferred homepage. Here’s how to add one.
Chrome

Source: Jon Martindale
- Open Chrome and select the three-dot menu in the top-right of the window.
- Select Settings at the bottom of the list.
- Select Appearance from the left-hand menu.
- Find “Show Home button” from the list and set the toggle to turn it on.
Firefox
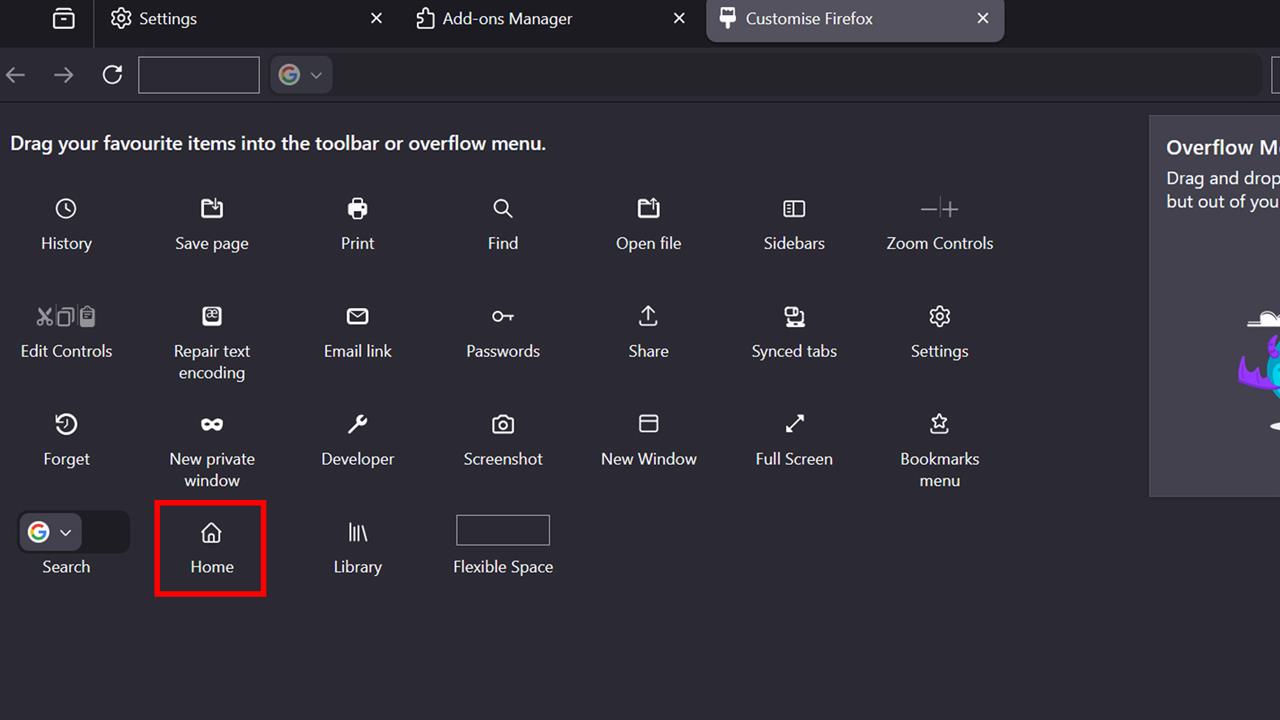
Source: Jon Martindale
- Open Firefox and select the three-line menu in the top-right of the window.
- Select More tools, then Customize toolbar.
- Locate the “Home” button in the list of icons, then click and drag it to where the Home button should appear in the Firefox window.
Edge
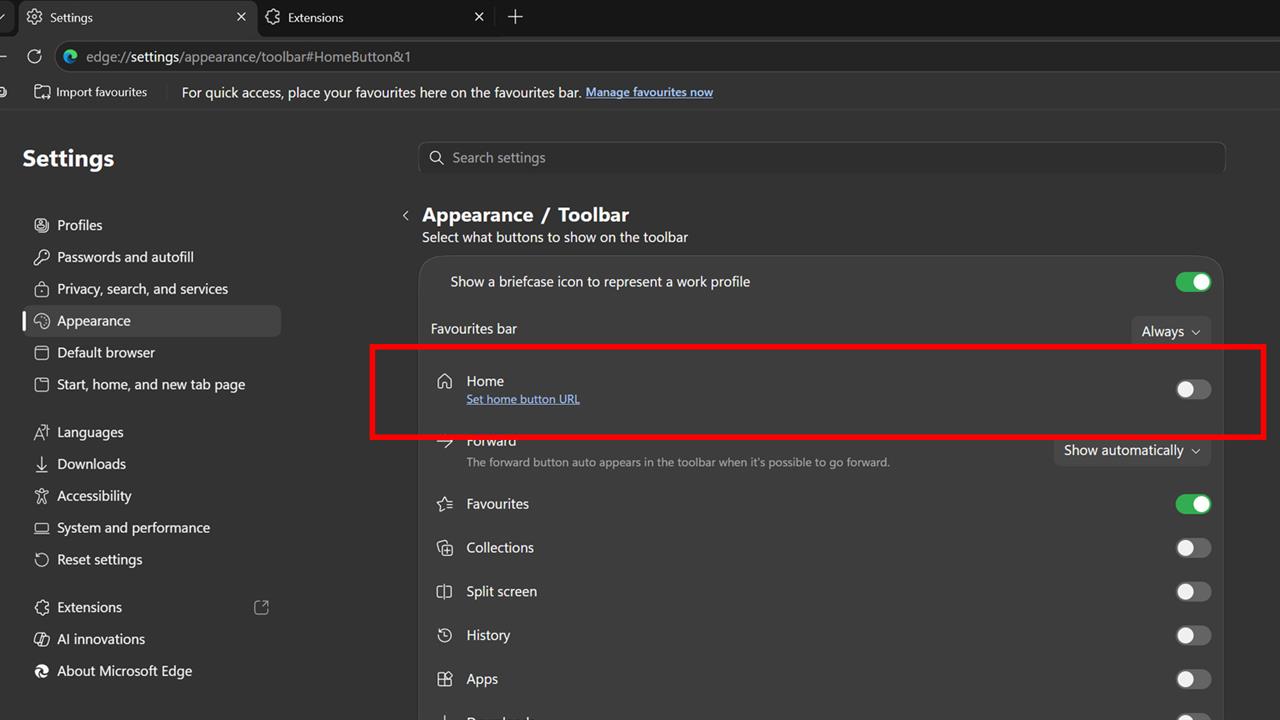
Source: Jon Martindale
- Open Edge and select the three-dot menu in the top-right of the window.
- Select Settings at the bottom of the list.
- Select Appearance from the left-hand menu.
- At the top of the page, select Home button.
- Next to “Home”, select the toggle to enable it.
How to remove a profile
To clear out an old user from Chrome or to delete an old profile you no longer use, you can simply remove the relevant profile.
Chrome
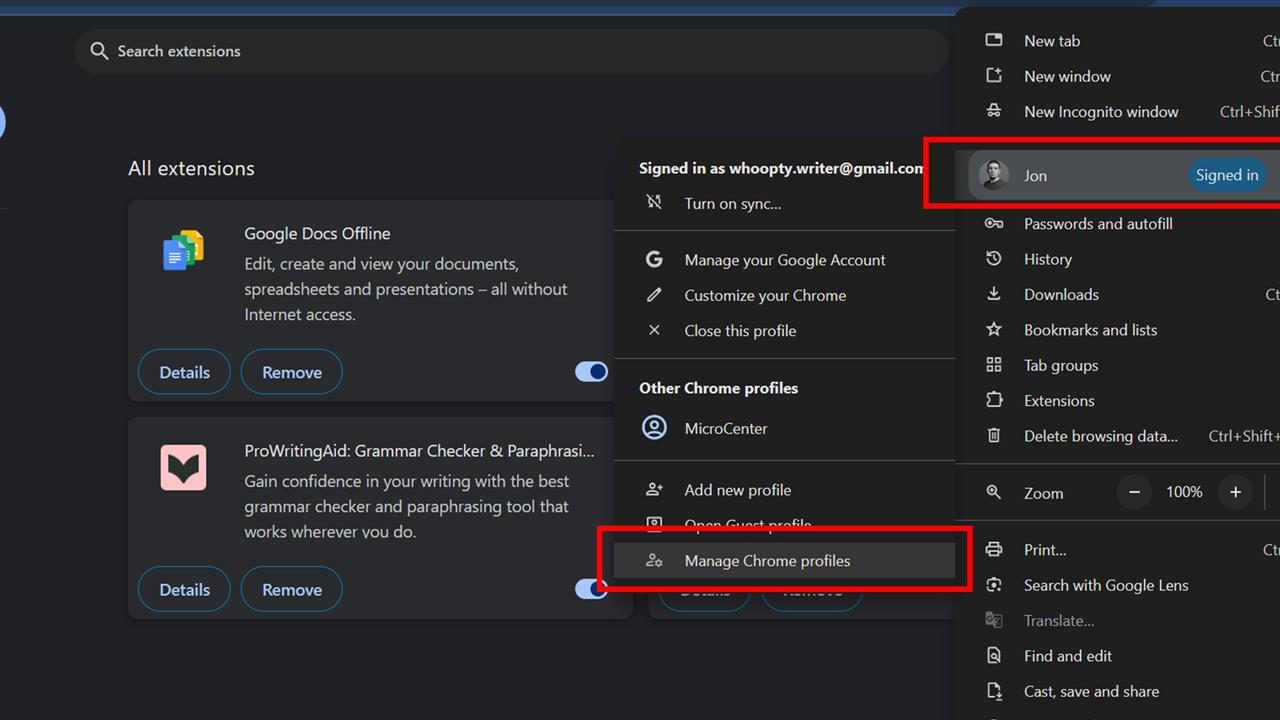
Source: Jon Martindale
- Open Chrome and select the three-dot menu in the top-right of the window.
- Select the active profile near the top of the menu list.
- Select Manage Chrome profiles.
- Locate the profile to be removed, then select the three-dot menu icon, followed by Remove.
Firefox
Source: Jon Martindale
- Open Firefox and select the three-line menu in the top-right of the window.
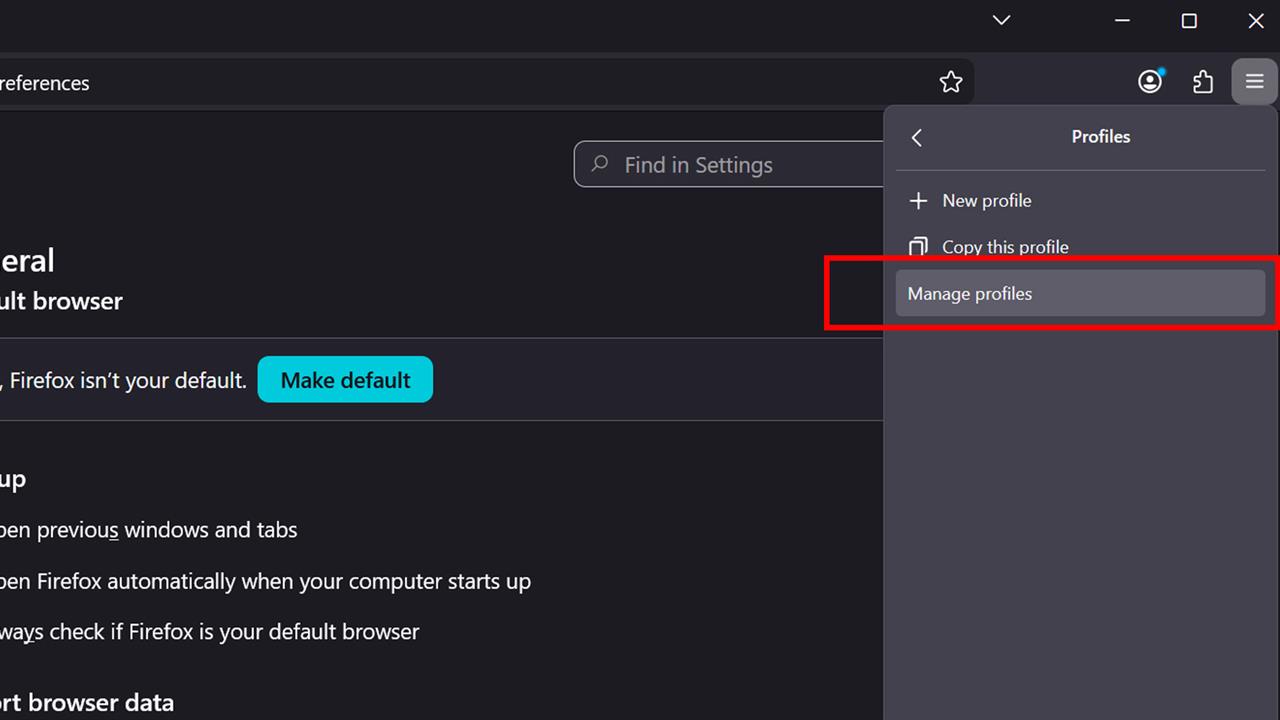
- Select the active profile near the top of the menu list, or if no profiles are active, the Profiles button.
- Select Manage Profiles.
- Locate the profile to be removed, then select the trash-can icon. When prompted, select Delete to finalize removing the profile.
Edge
Source: Jon Martindale
- Open Edge and select the three-dot menu in the top-right of the window.
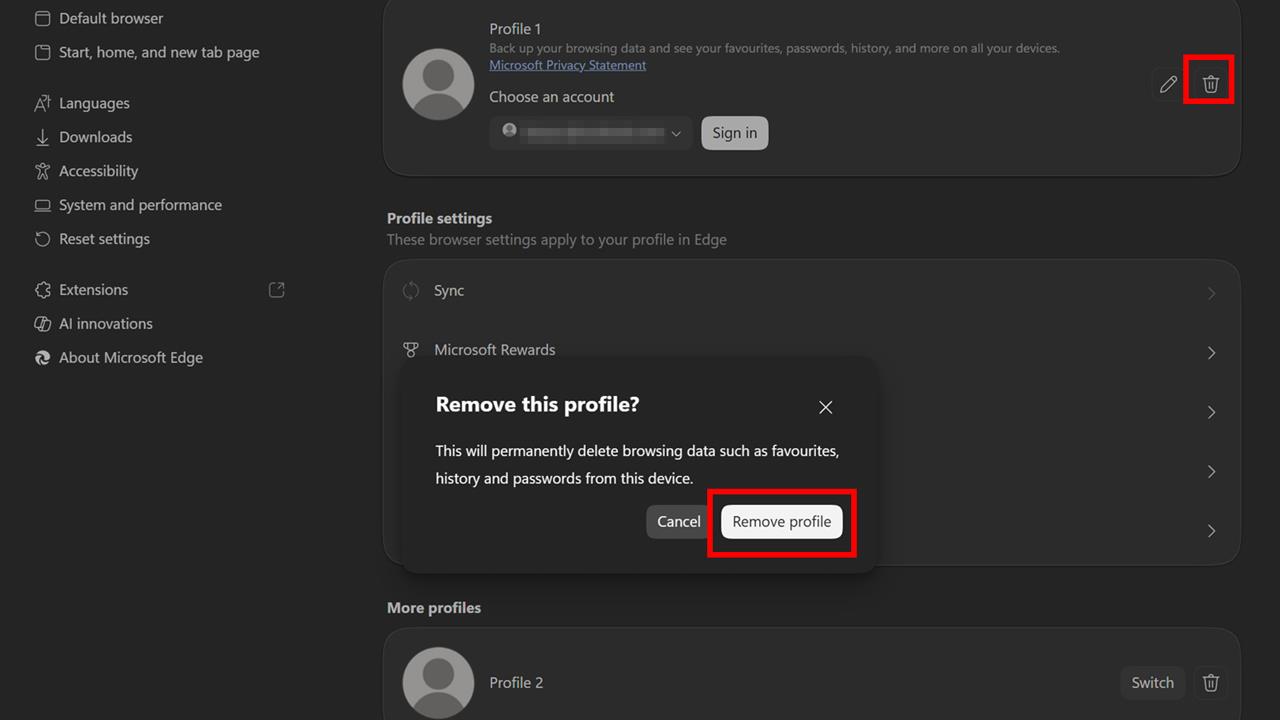
- Select Profiles from the top of the left-hand menu if it isn’t already selected.
- Under the heading “Profiles,” locate the profile to be removed, then select the trash-can icon next it. When prompted, select Remove profile to finalize removing it.
How to manage auto-fill
Auto-fill is very useful for automatically typing in passwords or filling forms. Here’s how to make sure it works when you want it, and doesn’t overstep the mark.
Chrome
Source: Jon Martindale
- Open Chrome and select the three-dot menu in the top-right of the window.
- Select Settings from the menu.
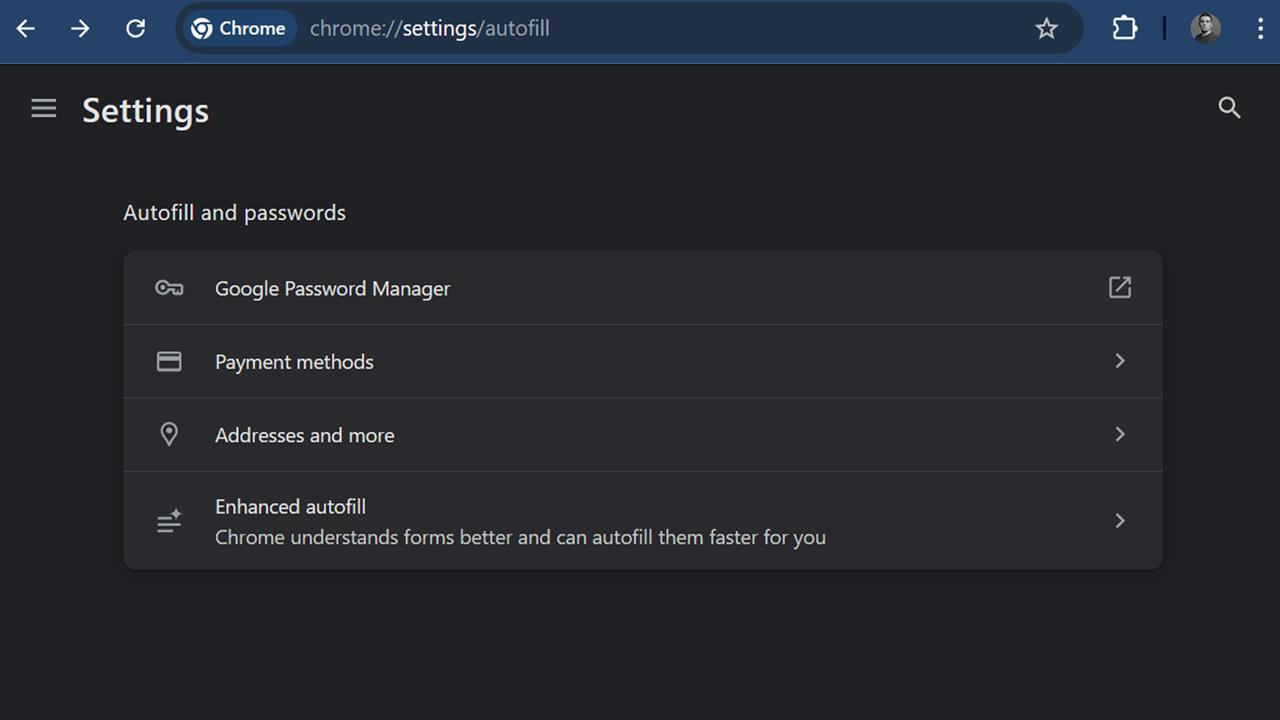
- Select Autofill and passwords from the left-hand menu.
- Select Google Password Manager to manage auto-fill passwords and what Chrome remembers.
Source: Jon Martindale
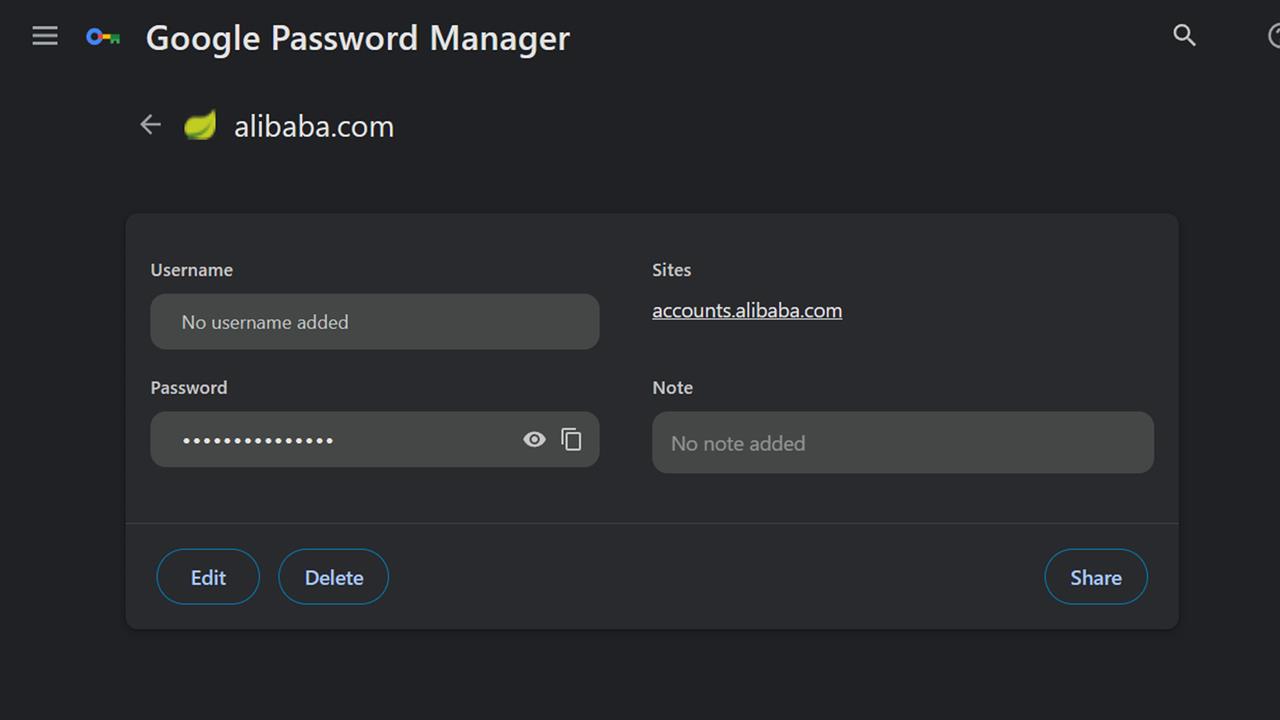
Select any passwords to be changed or removed from Chrome. Select Edit to change what password Chrome saves for that account. Select Delete to remove it from Chrome. Passwords can also be copied and shared from this location using relevant buttons.
- Select Payment methods to adjust Chrome’s saved data about payment methods.
-
Use the various toggles to adjust what Chrome remembers about payment methods. Individual payment methods Chrome has saved can be selected to edit or remove them as necessary.
- Select Addresses and more to adjust what address data Chrome saves.
-
Use the toggles to turn this feature on or off; whether addresses will be saved and suggested while browsing.
- Select Advanced autofill to adjust whether Chrome uses more advanced autofill functions or not.
-
Use the toggles to turn this feature on or off. Information about the user can also be removed from this menu.
Firefox
Source: Jon Martindale
- Open Firefox and select the three-line menu in the top-right of the window.
- Select Settings near the bottom of the list.
- Select Privacy and Security from the left-hand menu.
- Scroll down to Payment methods. Use the toggles to turn on or off the saving and auto-filling of payment methods. A device sign-in can also be enabled to autofill payments for added security.
-
Select Manage payment methods to add new payment methods, or delete existing ones.
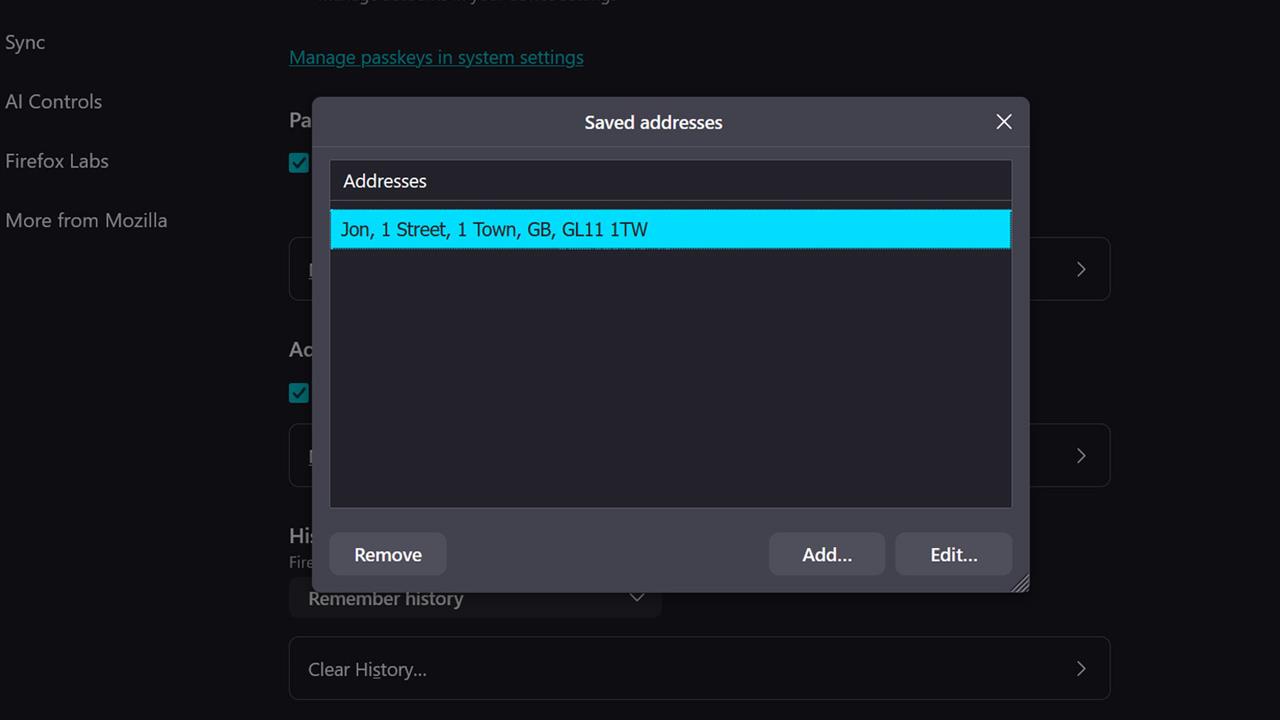
- Under “Addresses and more,” Save and autofill addresses can be toggled on or off.
-
Select Manage addresses and more to add new addresses, and edit or remove existing ones.
Edge
Source: Jon Martindale
- Open Edge and select the three-dot menu in the top-right of the window.
- Select Settings from the menu.
- Select Passwords and autofill from the left-hand menu.
- Select Microsoft Password Manager to manage auto-fill passwords and what Edge remembers. The on-screen toggles can be used to enable auto-filling passwords, or to require a prompt before doing so.
-
Select any of the saved passwords to edit them, or delete them. Passwords can also be copied and shared from this location using relevant buttons.
- Select Payment methods to manage saved payment details. There are toggles for what Edge remembers, such as security codes, Buy Now Pay Later options, or express checkout options that use saved information.
-
New payment methods manually in this menu, and individual saved payment methods can be selected for editing or deletion as necessary.
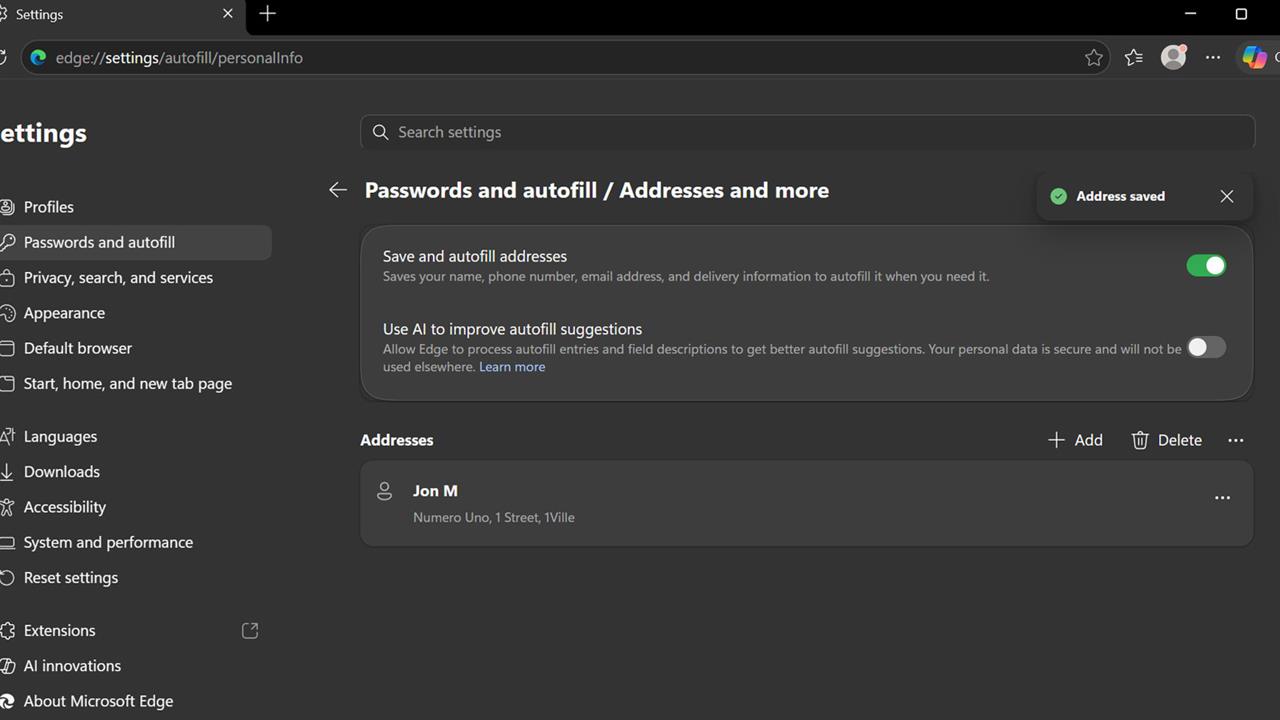
- Select Addresses and more to manage saved address details. The toggles can also be used to turn auto filling addresses on and off, and whether AI should be used to improve autofill suggestions.
-
Use the Add and Delete buttons to add new addresses or remove old ones. Alternatively, select the three-dot menu next to each address to edit them manually.
Have more questions about your web browser? Worried your computer might be acting up? Our experts can help! Schedule an appointment with the Knowledge Bar by visiting our Services webpage.
More from MC News
- Run AI Locally: The Best LLMs for 8GB, 16GB, 32GB Memory and Beyond
- Quantization Explained: Why the Same LLM Gives Better Results on High-End Hardware
- Why VRAM and Memory Bandwidth are Key for Powering Local AI
- Hands-on with NVIDIA DGX Spark: Everything You Need to Know
- How to Build a PC with a Hardline Water-Cooling Loop
- 3D Print a Mac Mini Monitor Mount
- The End Has Come for Windows 10: Four Tips to Make the Most of Windows 11
- Everything You Need to Know About WiFi 7
- Keyboard 101: Intro to Computer Keyboards
- Fix It Yourself: Talking to iFixit on Why Repairable Tech Matters
Jon Martindale is a freelance technology journalist and writer from Gloucestershire, UK. He's written for a range of publications over a 20-year career, including DigitalTrends, USNews, Forbes, and Lifewire, among many others. Over that time he's written countless how-to guides, best-of lists, hands-on reviews, and in-depth op/ed features.
He has been building and working with computers since his teens, and loves nothing more than trying out the latest components and gadgets to see what they can do. When he isn't staring at a monitor, he can be found chasing after with his two young children, playing board and roleplaying games, or walking his French bulldog cross.


