

Mastering Multi-Material with Bambu Lab


Photo: Denise Bertacchi
Bambu Lab didn’t invent multi-material 3D printing, but they did make it effortless and affordable. The standard Bambu Lab Automatic Material System (AMS) is an airtight filament feeder that sits on top or beside the 3D printer. It typically holds four spools and contains an RFID reader that automatically detects tagged Bambu spools, relaying material properties and colors back to your copy of Bambu Studio. While it works best with Bambu spools, brands like Micro Center’s Inland are compatible, so long as you manually enter the filament information.
The AMS is instrumental in turning your single nozzle 3D printer into a multi-color and multi-material beast. Each slot has its own motorized feeder directly controlled by the printer, allowing it to load and unload material to the toolhead as the model’s g-code dictates.
There are currently four AMS units you can use: The original AMS, the AMS 2 Pro, the AMS HT and the AMS Lite. Several AMS units can be daisy chained together, allowing you to print with up to 25 colors, depending on the 3D printer.
Bambu Lab AMS: The Original AMS, this unit holds four spools and has a pocket for desiccant to keep filament stable. It is compatible with the X1, X1 Carbon, X2D, P1S, P2S, H2S, H2D and H2C. It can be used with the A1, A1 Mini and A2L with an adaptor.
Bambu Lab AMS 2 Pro: The upgraded AMS, this unit holds four spools and has an active heating and ventilation system to use as a filament drier. It can heat up to 65°C, allowing it to dry PLA, PETG and TPU. It is compatible with the X1, X1 Carbon, X2D, P1S, P2S, H2S, H2D and H2C. It can be used with the A1, A1 Mini and A2L with an adaptor.
Bambu Lab AMS HT: A single slot AMS, this unit holds one spool and has an active heating and ventilation system to use as a filament drier. It can heat up to 85°C, allowing it to dry even high temperature filaments. It is compatible with the X1, X1 Carbon, X2D, P1S, P2S, H2S, H2D and H2C. It can be used with the A1, A1 Mini and A2L with an adaptor.
Bambu Lab AMS Lite: A simple, open frame AMS designed for the A1, A1 Mini and A2L. Only one AMS Lite can be used at a time.
What Filaments Work in an AMS?
Not every filament is AMS friendly. Abrasive materials like Carbon Fiber PETG or glow in the dark will wear a hole in your machine’s tubing, and most TPU is much too soft to push through the system. The exception to the rule is “TPU for AMS”, produced by both Bambu Lab and our own Inland Filament. It’s stiffer, but still pliable enough for practical prints that need a little squish.
The Waste Problem with AMS
Single nozzle Bambu Lab printers are notorious for wasting filament when using an AMS. These printers (X1, P1S, P2S, H2S, A1, A1 Mini and A2L) cut filament off at the top of the hotend, just above the heatsink, before pulling it back toward the AMS. This leaves about .15 grams (a 50mm length) of molten material trapped in the hot assembly that the incoming color has to push out of the nozzle. It can take as much as .3 grams to clear and prime the nozzle for the next color.

Photo: Denise Bertacchi
The community has affectionately dubbed the purge waste “filament poop.”
Switching colors (or materials) also costs time. First Gen printers using the original AMS can take up to 90 seconds to switch colors. When your print has hundreds of color swaps, this wasted time can add hours to your print.
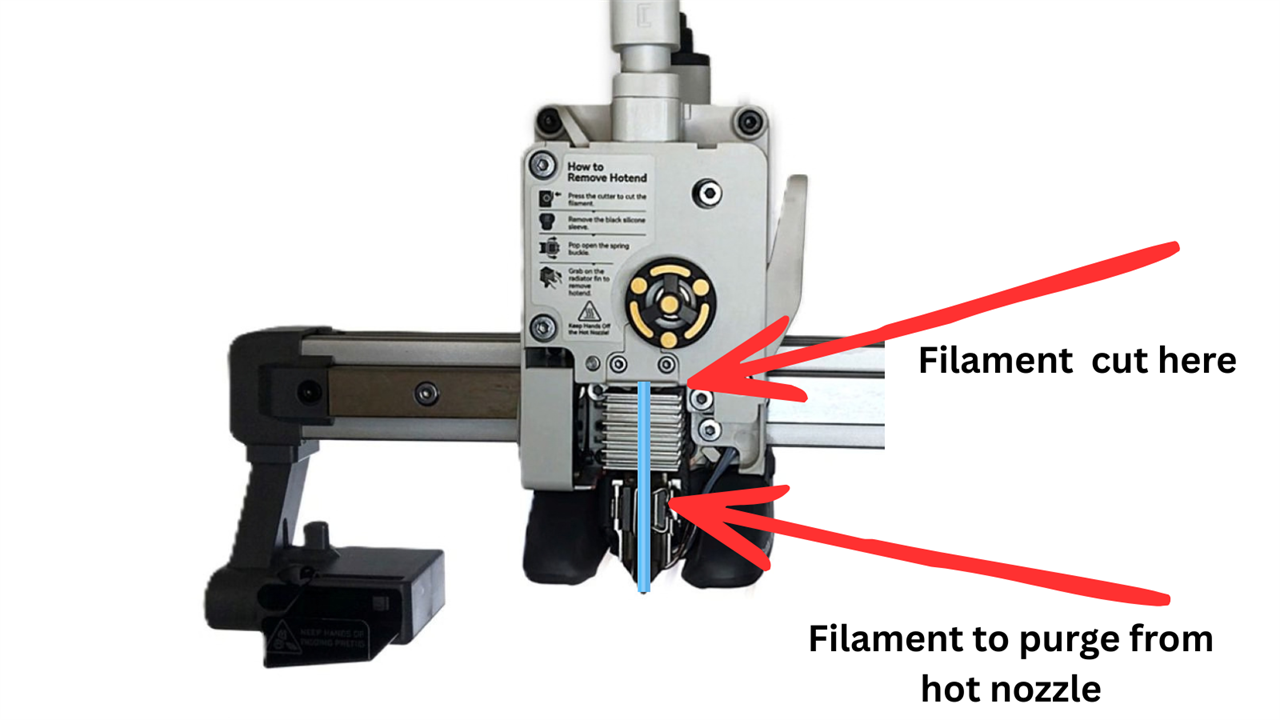
Photo: Denise Bertacchi
Practical vs Aesthetic
You can do more than just run glitter rainbow PLA through your AMS unit. You can also print practical objects that mix filaments with different technical properties. For example, you can add TPU hinges, soft PLA grips, or breakaway supports when you mix materials.
Materials with different chemical makeups or temperature settings often refuse to stick to each other. You can take advantage of these natural “no stick” properties by using them for support. PLA and PETG are widely used as inexpensive supports for each other. Some materials are made specifically for supports, like HIPS or PVA, a water soluble support material.
TIP: When using mixed materials for supports, select Support→Filament for Supports→ Support/raft interface to speed up the process. You can also save money on supports by swapping out a cheaper filament for the support material.
Save Time and Money with Two or More Nozzles

Photo: Denise Bertacchi
If the thought of throwing away a bucket of printer poop to avoid hand painting your models terrifies you, a printer upgrade might be in your future. Bambu Lab’s X2 and H series of printers all use two or more nozzles to make multi-material faster and more affordable.
How? By giving filaments their own dedicated hotends, multi-nozzle printers reduce the need to retract filament back to the AMS or clean out nozzles before switching colors.
Let’s use this model of Princess Donut from Dungeon Crawler Carl as an example. All prints will use the same default .2mm layer height settings, but with 3 walls for quality and 10% gyroid infill. We’ll also use organic supports and default purge settings.
Run as a single color print on a P2S, this model is 88.39 grams of material, with 31.68 grams of support and takes 6 hours and 48 minutes to print.

Load that P2S with four spools of filament and now we have a more vibrant model that takes 52 hours and 29 minutes to print, needs 30.83 grams of support, 101.58 grams of prime tower, and a whopping 577.5 grams of printer poop. Oddly enough, it also takes 21.13 grams more for the model, since the extra colors are adding interior walls for the color blocks. We are now using a total of 819.42 grams of filament for this print, 709.9 of which goes right into the recycle bin.
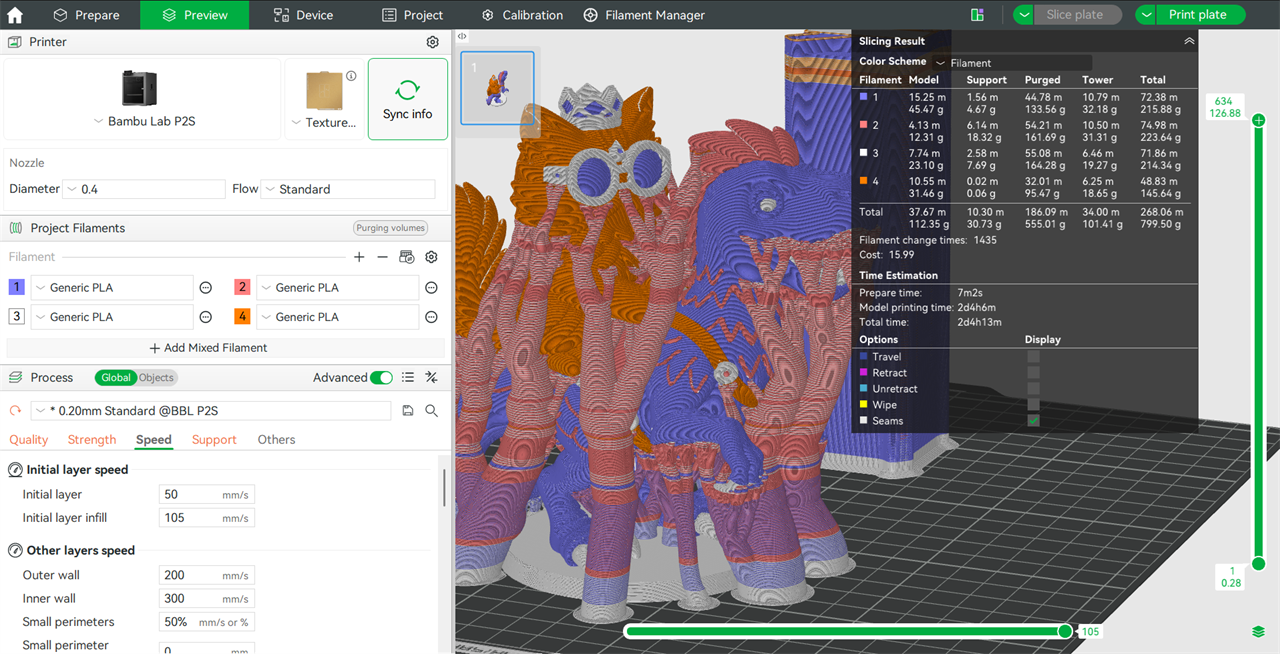
Let’s transfer this file to the X2D, a dual nozzle machine with a four color AMS 2 Pro. While some say the X2D’s auxiliary bowden nozzle is best for support material, that won’t save us any time or filament. Instead, let’s put Mongo’s purple filament in the auxiliary nozzle. Now we’ve cut the time to 44 hours and 36 minutes, with only 323 grams purged, saving 219.78 grams. That’s nearly a quarter spool of material.
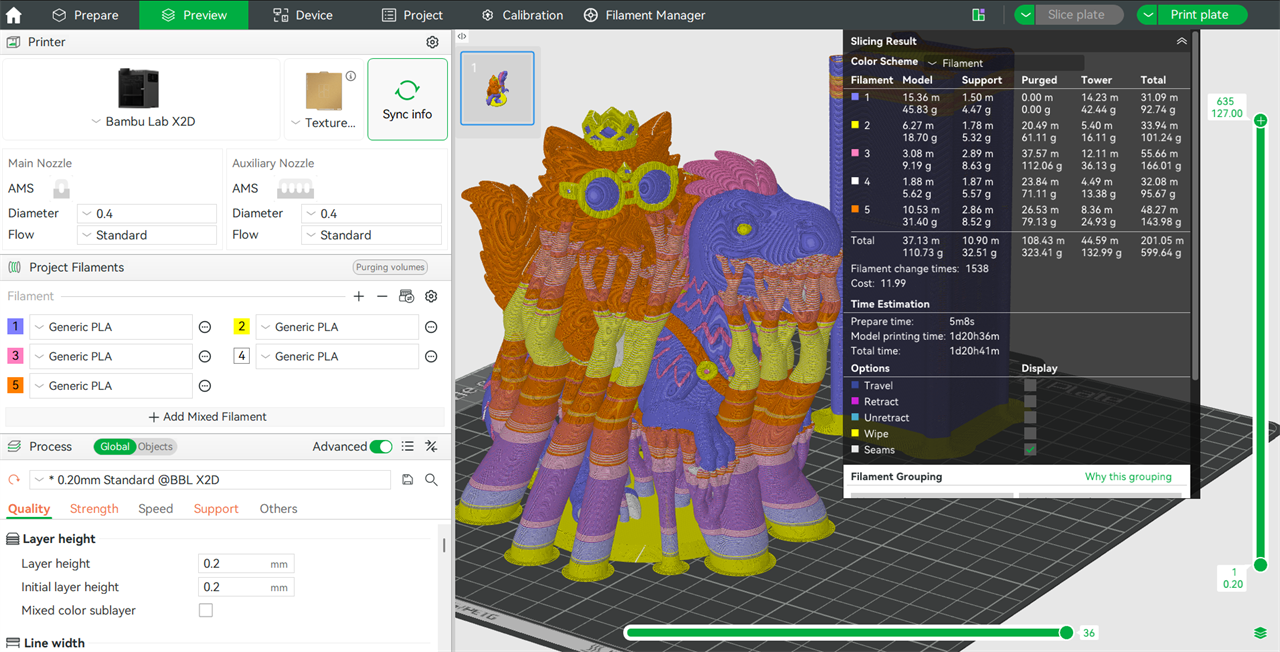
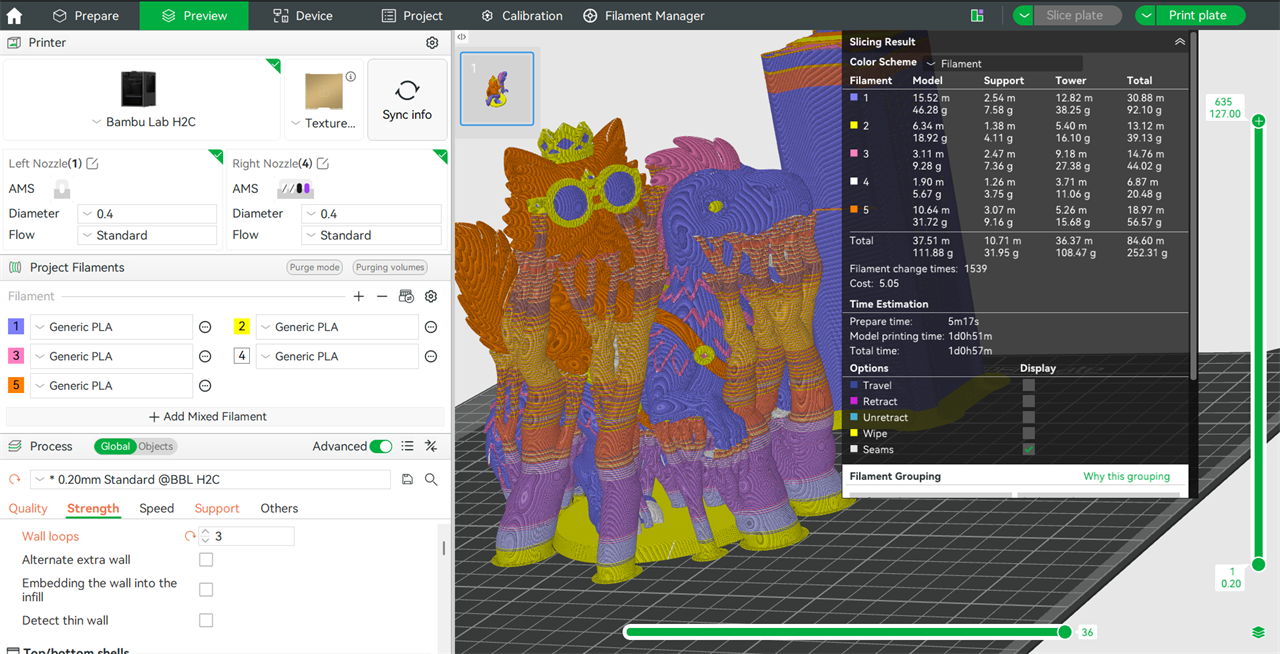
Now let’s run it on the H2C, a five nozzle toolchanger (or some might call a nozzle changer). We’ve cut the time in half to 24 hours and 51 minutes, with 108.47 grams in the tower and no printer poop. The total filament used is 252.31 grams, which is just about twice that of the model.
Buying a more expensive toolchanger isn’t the only way to save filament. A few handy slicer hacks can also help out. Going back to the X2D model, we can save four hours and 85 grams of material by dialing back the purge volume to .75 and turning on “purge to infill.”

Bambu Lab’s multi-material system changed the way we think about 3D printing, making it easier than ever to blend colors and diverse materials into our models. While the market is shifting toward more efficient multi-nozzle tool changers, the standard AMS will remain as a key component for entry level 3D printers for years to come.
Model Credit: Princess Donut Riding Mongo - Dungeon Crawler Carl By Loligo, MakerWorld
More from MC News
- Run AI Locally: The Best LLMs for 8GB, 16GB, 32GB Memory and Beyond
- How to Use Local AI With Your Own Files: A Beginner's Guide to RAG
- Reading vs. Answering: The Two Hardware Bottlenecks Behind Local AI Performance
- How to Use a Local LLM in Visual Studio Code
- Hands-On with the AMD Ryzen AI Halo
- Quantization Explained: Why the Same LLM Gives Better Results on High-End Hardware
- Why Context Length, Not AI Model Size, Is Your Biggest VRAM Problem
- How to Use LM Studio to turn your PC into an AI Server
- Why VRAM and Memory Bandwidth are Key for Powering Local AI
- Keyboard 101: Intro to Computer Keyboards
- Fix It Yourself: Talking to iFixit on Why Repairable Tech Matters
- The Local LLM Your Laptop's Been Waiting For
- Gemma vs Qwen: Which Local AI is Best?


