

How to Set Up Windows LAN File Sharing

Back in Windows 7, HomeGroup made file sharing simple. Unfortunately, the feature was deprecated and eventually removed in 2018. Since then, file sharing is just a little bit more tricky.
 Photo: Chris Hoffman
Traditional Windows network file sharing is still available; you can share files between PCs on your local network and you can even connect to the file share from a Mac or a device running Linux, like a Raspberry Pi. If you'd rather not turn your Windows PC into a network file server, you can get a NAS — but Windows network file sharing isn't hard to set up.
How to activate network file sharing
Network file sharing is turned off by default, so it will need to be turned on before any file sharing. First, a network will need to be designated as a private network. This should only be done on a trusted network, like a home or office network; Never set a public Wi-Fi network as private.
To do this, open the Settings app on Windows 11, select "Network & Internet," and click "Properties" for the current network connection. Under Network profile type, select "Private network."
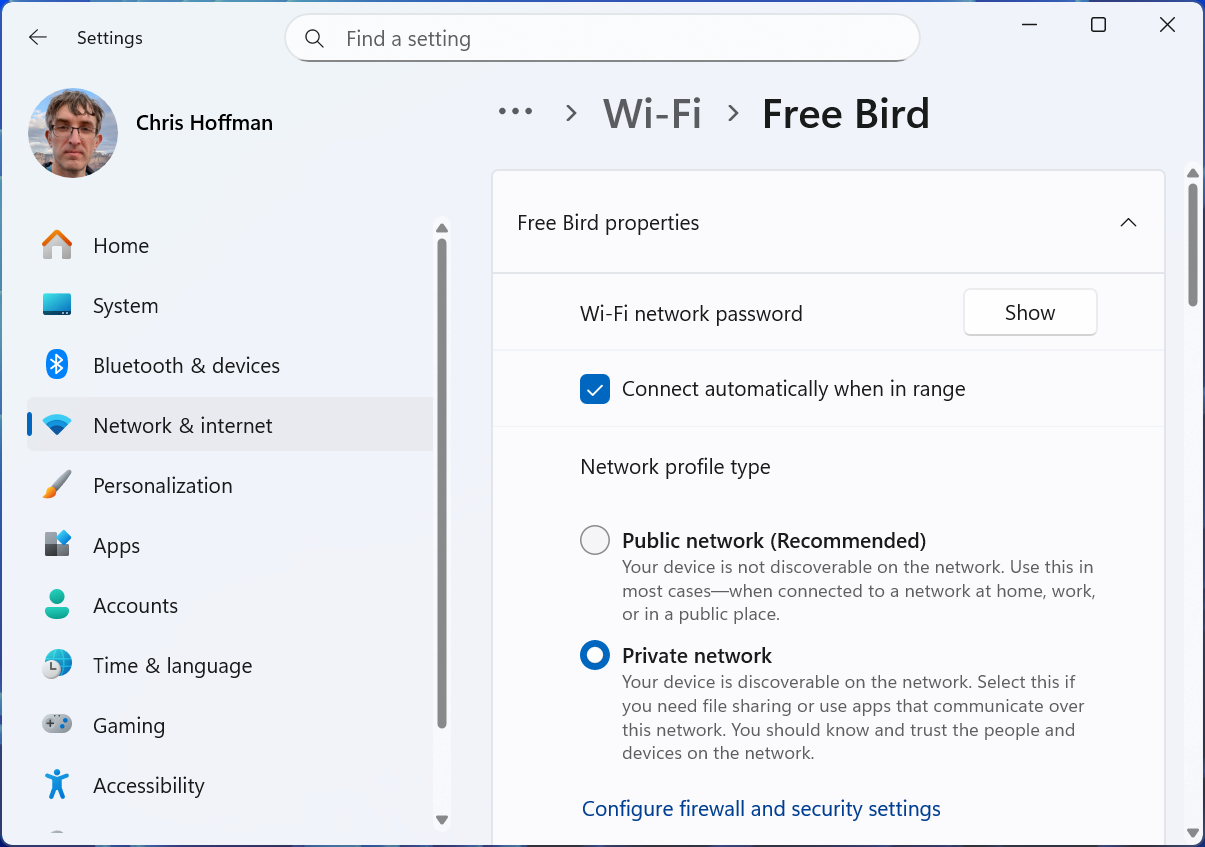
Next is turning on file sharing. To do so, open File Explorer and click "Network" in the left pane. If there is a yellow banner saying file sharing is turned off, click the banner and select "Turn on network discovery and file sharing" to activate it.
This process will need to be repeated on each PC that will be sharing files with the network.

Network file sharing is now activated, but the PC isn't sharing any folders on the network yet. The folder can be shared with just the current account, with everyone on the network, or password protected.
How to use network file sharing
The simplest way to set up file sharing is to share a folder between two computers logged in to the same account. It's easy to set up, and won’t require a password after the initial connection.
First, choose a folder to share or create a new folder. A common one is at "C:\FileShare".
In File Explorer, right-click the folder to be shared on the network and select "Show More Options." Point to "Give Access To" and select "Specific people."

The Windows user account will be automatically set as the "Owner" here. Assuming all PCs are signed-in with the same Microsoft account, that’s all there is to it — just click "Share" and the shared folder will be accessible from other PCs logged in on the local network.
If the network has multiple PCs with different accounts, the folder can be made accessible to everyone.
To do so, click the dropdown box, and select "Everyone." Then, click "Add." Choose whether to give everyone read and write permissions, or just read permissions. When done, click "Share."
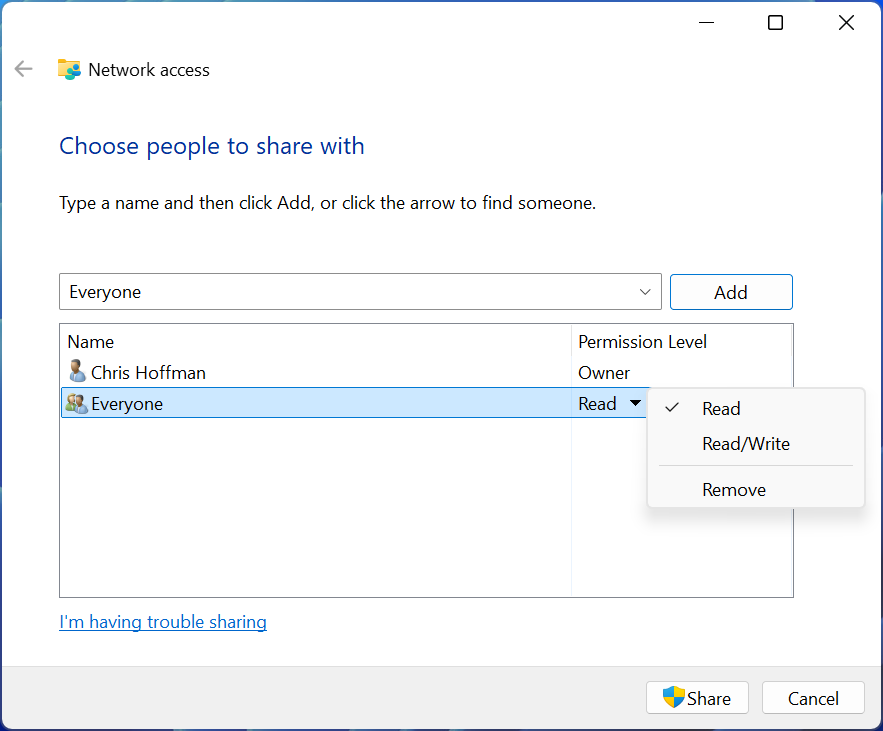
Everyone on the local network will have access to the folder, no password required, with the permissions selected, so be sure the users and network are trusted. However, the folder will only be shared when on a network marked private.
How to password protect a shared folder
For additional security, file sharing can be password protected. The easiest way to do this is by creating a local user account with a custom username and password. This local user account will just be used to access the file share; no need to log in or set up a desktop.
To set this up, create a local user account. Open the Settings app and head to Accounts > Other users. Click "Add account," choose "I don’t have this person's sign-in information," and then click "Add a user without a Microsoft account." Enter a username and password. This username and password will be used when connecting to the shared folder from another PC.
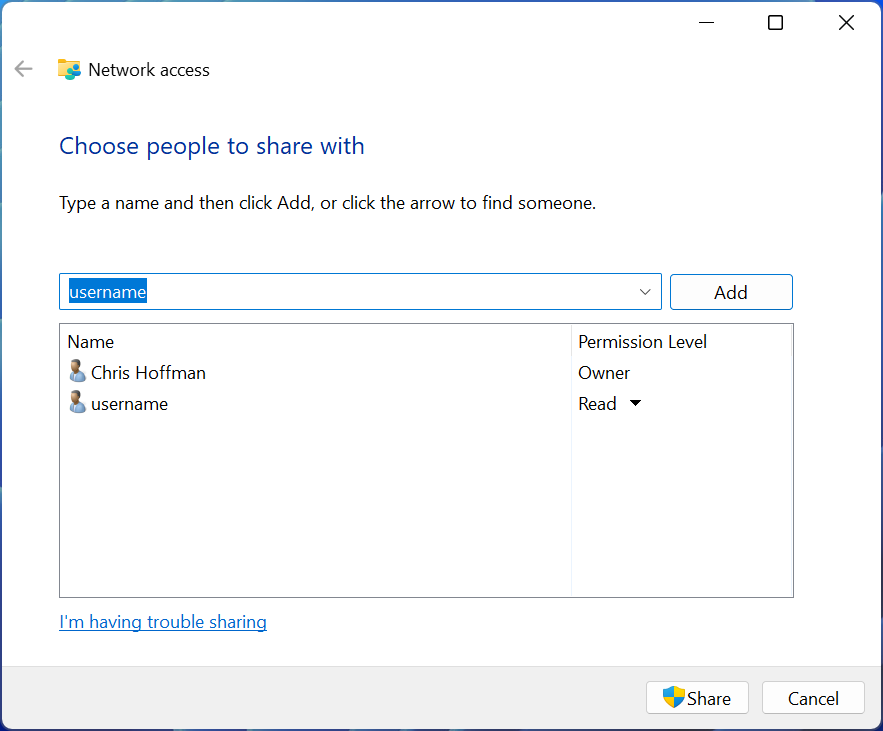
Then, right-click the shared folder in File Explorer, and click Give access to > Specific people. Choose the account just created from the dropdown box, click "Add," choose whether to give the account Read or Read/Write access, and then click "Share." Now, the only people who can access the file are those with the custom username and password.
Access the file share from another PC
To access the file share on other PCs, open File Explorer and select "Network." If a PC is sharing a folder, you'll see the name of the PC here. Double-click the PC and then double-click the folder to access.
If the same Microsoft account is being used on both PCs or if the folder is shared with "Everyone," all files will be accessible without providing a password.
If the files are password-protected, Windows will ask for the username and password. If Windows doesn't accept it, try entering the username in the format "COMPUTER\username", where COMPUTER is the name of the PC hosting the shared folder.
A shared folder can also be marked as a drive (like C: or D:) by right-clicking and selecting "Map Network Drive.”

Windows uses the SMB protocol and can be connected to from a Mac, Linux PC, or even a Raspberry Pi.
When you should consider a NAS instead
If you're willing to add a new device to your network, there's a better way to set up a network file share that works even when your PC isn't powered on: Network attached storage.
A NAS runs 24/7 as a dedicated server and uses less power than a desktop PC. NAS devices also offer dedicated apps and web interfaces, giving you access to your files from your phone — and even remotely over the internet, if you want.
While Windows network file sharing still works, a NAS is a real quality-of-life upgrade.
If you’re looking for additional help setting up local sharing (or with just about anything computer!) the Micro Center Knowledge Bar is happy to help. Schedule an appointment with the Knowledge Bar by visiting our Services webpage.
Or, if you’re ready to make the leap into NAS, our knowledgeable associates will be happy to help pick out the perfect storage for your needs.
More from MC News
- Run AI Locally: The Best LLMs for 8GB, 16GB, 32GB Memory and Beyond
- Quantization Explained: Why the Same LLM Gives Better Results on High-End Hardware
- Why VRAM and Memory Bandwidth are Key for Powering Local AI
- Why AMD's 3D V-Cache is Having a Moment
- The Micro Center Monitor Buying Guide: Part 1
- Keyboard 101: Intro to Computer Keyboards
- Fix It Yourself: Talking to iFixit on Why Repairable Tech Matters
- Hands-on with NVIDIA DGX Spark: Everything You Need to Know
Chris Hoffman is a veteran tech journalist and the former Editor-in-Chief of How-To Geek. He's been going hands-on with PC hardware and getting his hands dirty with Windows for 15 years. And has written for publications including PCWorld, PCMag, Computerworld, The New York Times, Fast Company, and Reader's Digest.


