
Complete Guide to Windows 11 Disk Management
Get (and keep!) your drives running, data where you want it, and storage tailored to your needs with this helpful guide.How-To

Modern Windows PCs and laptops need more storage space than ever. With larger apps, games, and expansive photo and video libraries, what once was possible with mere gigabytes now often requires terabytes of space to handle all of our data. To manage your storage drives in Windows, the built-in Disk Management utility is excellent, but there are some powerful command-line tools you can use too, and a few additional apps and services worth being aware of.
 Photo: Jacob Bobo
If you want to install new drives, set up new partitions, format your old drives, or anything else besides, here's a comprehensive guide to Windows disk management, so you can keep on top of all your storage.
Note: While the following instructions mainly focus on Windows 11, they are also mostly applicable to Windows 10, too.
How to Initialize a New SSD
If Windows isn't being installed onto a new SSD directly, the drive will need to be initialized in Windows before it will show up in the File Explorer and allow you to install apps, games, or anything else.
- Search for "Disk Management" in Windows search and select Create and format hard disk partitions from the results to open Windows Disk Management.
- Disk Management may detect the new drive and immediately ask to initialize it. If so, skip to Step 4. Otherwise, move on to Step 3.
- Right-click or tap and hold on the new drive to be initialized, then select Initialize Disk from the drop-down menu. If the drive is listed as "Offline," first select Online from the drop-down, followed by Initialize Disk.
- In the new window that appears, make sure the correct drive is selected. For partition style, most users will want GPT (GUID Partition Table) as it's designed for modern systems and drives. Alternatively, for older hardware or operating systems, MBR (Master Boot Record) can be selected instead.
- Once a partition option has been chosen, select OK to finalize initialization. It will take a moment to complete, but then the drive will be listed as Online and it can be used like any other SSD.
How to Create and Format a New Partition
 Photo: Jon Martindale/Microsoft Windows
Multi-terabyte SSDs and hard drives work just fine as single, large volumes of storage, but you can also split them up into separate partitions. This can be useful for appointing storage for different tasks, like having a dedicated operating system install, or a protected area for personal data.
- Open Disk Management and locate the drive to be partitioned. It will need to have a portion of "Unallocated" space to create a new partition. If the drive has already been partitioned, existing partitions can be shrunk to make some unallocated space — see below — but that will mean sacrificing space on that existing partition.
- Right-click on the unallocated region of the drive's storage, and select New Simple Volume.
- Select Next, then choose the size of the volume. The default is the maximum size, so it will completely utilize the existing unallocated space on the drive. For anything smaller, input the size of the partition in Megabytes. When you're happy with the partition size, select Next.
- The new partition will be allocated a drive letter, or one can be chosen from the drop-down menu. Select Next.
- In the Format Partition dialog box there are two options. If the new partition should be formatted, select Next. If the new partition should not be formatted, select Do not format this volume, and then select Next.
- Select Finish to finalize the creation of the partition, and format it (if selected).
How to Clean and Format Existing Drives
If you have an older SSD or hard drive that you want to clear out and start fresh with, you can format the drive in Disk Management.
- Open Disk Management and find the drive volume to be formatted. This can be done in the list at the top, or the partitions below.
- Right-click on the volume to be cleared and select Format.
- In the pop-up window, input a new Volume Label (or leave it as "New Volume"), and choose the file-system if necessary. Most users will leave "Allocation unit size" at the default 4096, but if the drive is primarily for smaller files, a smaller size may be preferred.
- Select either a "Quick Format," which will merely forget where existing data is on the drive, or untick that box to perform a more in-depth cleaning. It still won't be as comprehensive as zero-filling the drive, though.
- When ready, select OK to begin formatting. Depending on the options selected and the drive specifications, it can take anywhere from a few seconds to a few minutes to complete.
How to Convert Drives from MBR to GPT
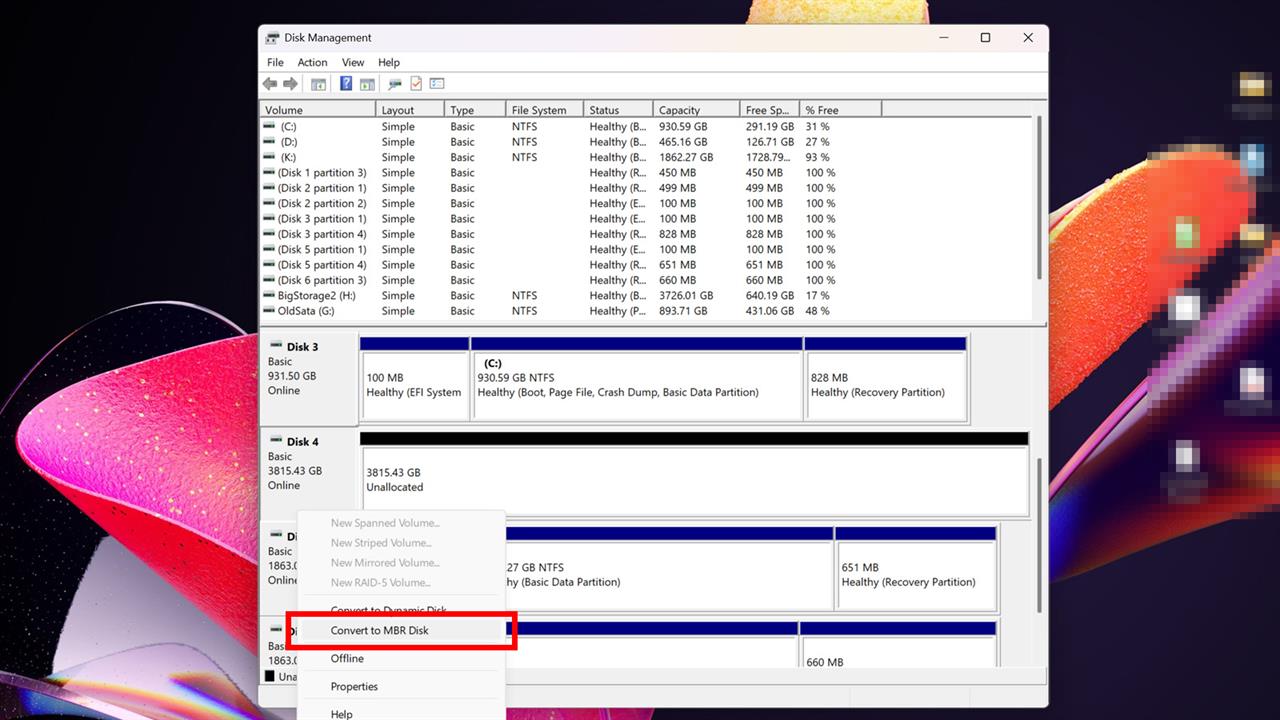 Photo: Jon Martindale/Microsoft Windows
If you have an old drive with an MBR partition scheme and want to switch it to the more-modern GPT, or have a modern GPT partition scheme drive and want to switch to the older standard, it's a relatively straightforward process. You will have to delete everything on the drive to do it, though, so be sure any data on it is backed up fully before proceeding.
- Open Disk Management and locate the drive to be converted to MBR or GPT.
- Right-click on any volumes it has, and delete them. The drive will need to be completely clear and with its full capacity "Unallocated."
- Once done, right-click on the disk name on the left-hand side, and select Convert to MBR or Convert to GPT, as required.
- The process should only take a few seconds. The unallocated space may split into two in case of switching to MBR, or combine into a single one in the case of GPT. In either case, once finished, a volume can be created within the drive to begin using it with its new partition scheme.
How to Use Disk Cleanup
If you're struggling for space on your SSD and don't want to delete any of your games, apps, or personal files, then Disk Cleanup can be a useful utility for finding a few extra gigabytes of storage capacity. It deletes temporary files that you may no longer need.
 Photo: Jon Martindale/Microsoft Windows
- Search for "Disk Cleanup" in Windows search and select the corresponding result.
- Choose the drive for the utility to clean up. Then select OK.
- Let the tool run.
- After the tool has finished, look through the list of cleanup suggestions and tick the boxes of the files that are okay to be permanently deleted. Then select OK.
- For more options, system files can also be cleaned up. It can take a little longer to run, but it will provide the option to remove old Windows Upgrade logs, which can add up to a few gigabytes in their own right.
How to Run Check Disk
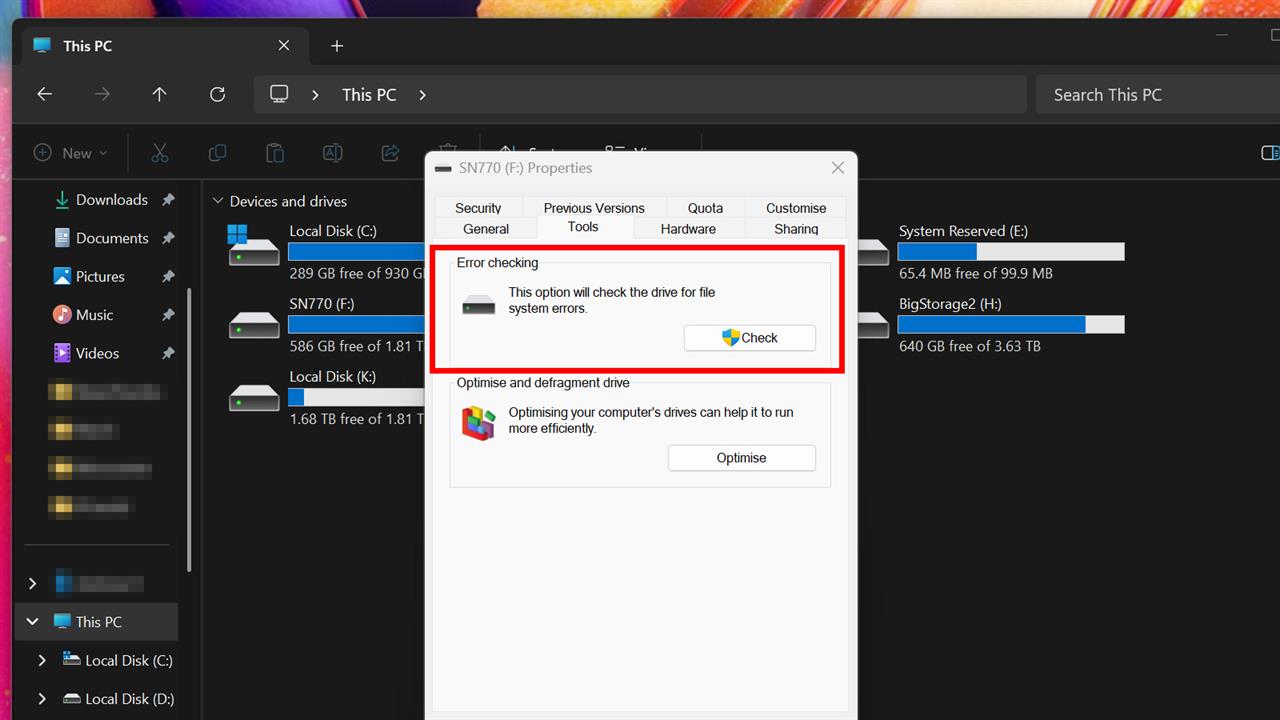 Photo: Jon Martindale/Microsoft Windows
If you encounter storage-related errors, blue-screens, or system crashes, you may want to run some checks on your SSD or hard drive to make sure it's working properly.
- Open File Explorer and select This PC from the left-hand menu.
- Locate the drive to run Check Disk on, and right-click it.
- Select Properties from the drop-down menu.
- In the new window that appears, select the Tools tab at the top.
- Under the heading "Error Checking," select the Check button and follow the on-screen instructions.
- It may report that the drive doesn't have any obvious errors. That's a good sign, but the check can still be run.
- Wait for it to complete. Windows will try to correct any errors it finds on the drive. It will provide a report on the status of the drive after it's complete either way.
If you still encounter errors after running Check Disk, consider running a utility like CrystalDiskInfo to check your drive's health. If it is looking a little worn, consider upgrading or replacing it to make sure your data remains secure and your system stable.
How to Extend and Shrink a Volume
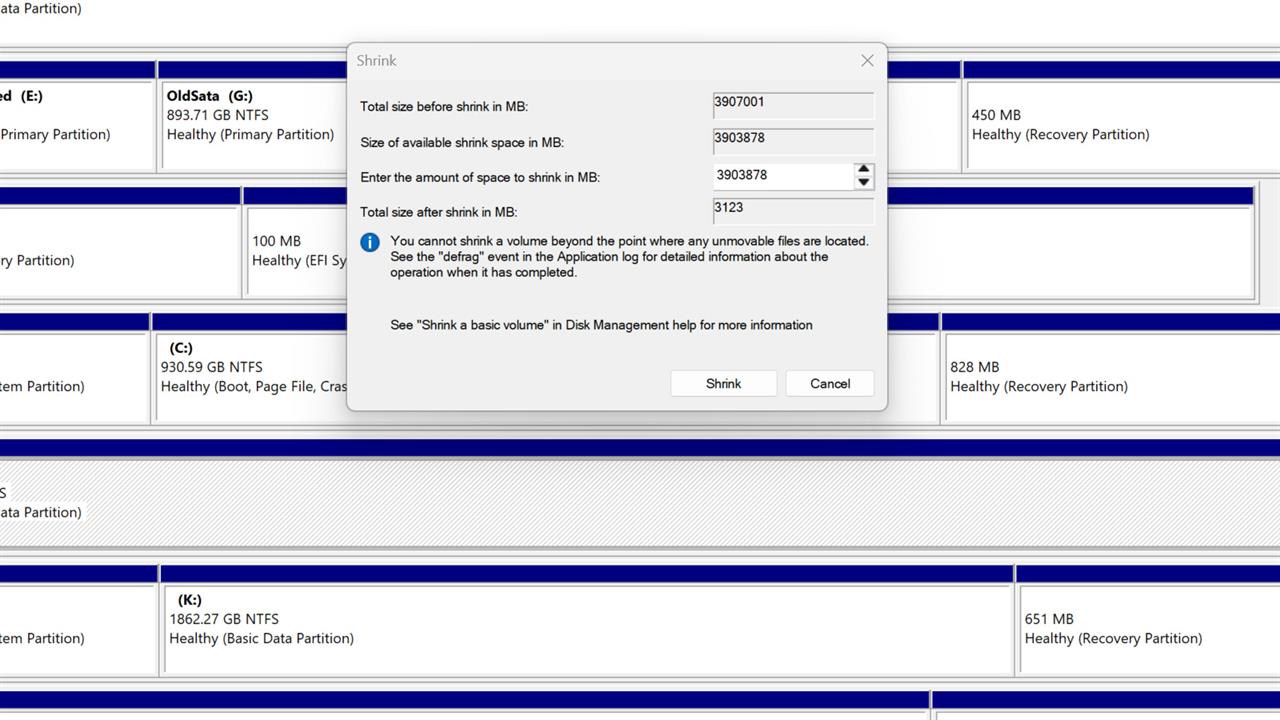 Photo: Jon Martindale/Microsoft Windows
If you've created several partitions on a drive, you may want to change their size at some point. It's possible to expand and shrink volumes as needed using Disk Management. To extend them, you will need unallocated space, so consider shrinking another volume before trying to extend one if you don't have any spare unallocated space on the drive.
- Open Disk Management and locate the drive for adjustment.
- Right-click on the Volume to be adjusted and select Shrink Volume or Extend Volume as required.
- For extending the volume, on the "Select Disks" screen, select the drive with unallocated space that can be used to extend the volume. To use all available space on the drive, leave the section "Select the amount of space in MB" with its default value. For anything smaller, input the number in Megabytes. When ready, select Next. Then select Finish.
- Shrinking a volume will require a bit of easy math. To shrink a volume, the amount it will be shrunk by needs to be input, not the desired size. Subtract the intended partition size from the current partition size and input the result, in Megabytes, in the box marked "Enter the amount of space to shrink in MB." In simpler terms:
- Current partition size [minus] intended partition size [equals] amount of space to shrink
- Once the shrink size has been calculated, press Shrink. The process will take a few seconds to complete in either case, but when it's complete check the drive in Disk Management to confirm the volume is now the preferred size. If additional unallocated space is created, it can be used to extend another volume, or create a new one to further partition the drive.
How to Change a Drive Letter
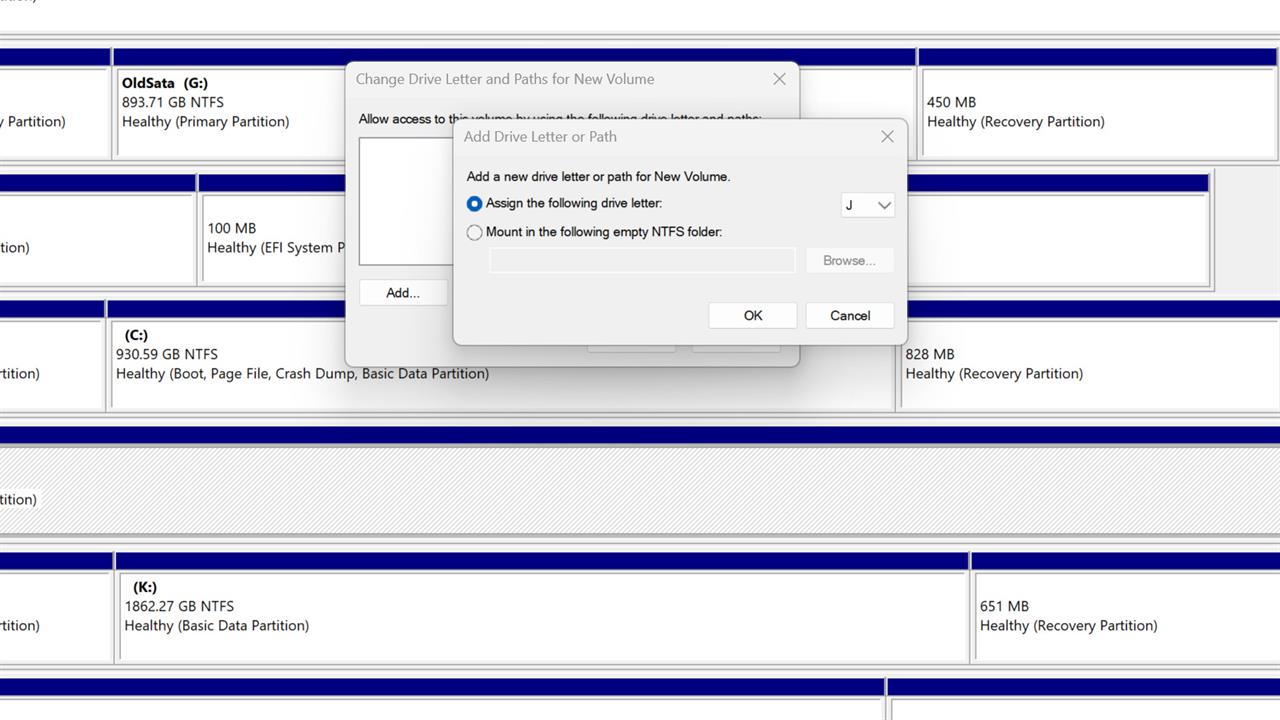 Photo: Jon Martindale/Microsoft Windows
If you'd rather a drive or partition had a different designation letter, you can change it in Disk Management. Note, however, that if you have apps or services that rely on that drive having that particular drive letter, you may break them when changing it, so proceed with caution.
- Open Disk Management and locate the drive selected for changing.
- Right-click the volume to be changed and select Change drive letter and Paths.
- If the drive letter is selected already, select Next and choose a new drive letter for it. If it's not selected (in the case of a new volume) then it may need a drive added in order to change.
- Follow the on-screen instructions to complete changing the drive letter.
How to Manage Drives Using Diskpart
In Windows 11, the built-in Disk Management tool is fantastic for managing your partitions, volumes, drive initializations and formatting. It's a quick-to-understand tool with an easy UI and straightforward commands. However, if you find it's not working for you, or a drive isn't appearing properly in it, you can try the more traditional Command Line approach using the powerful Disk Part tool, though we recommend extreme caution.
Disk Part does give you more control over your drives, but it also lacks some of the safeguards of Disk Management. Be careful you don't accidentally wipe an important drive by typing in the wrong drive letter, for example.
- Type CMD into Windows search. Right-click the corresponding result and select Run as administrator.
- Type in diskpart and press Enter.
- To see a list of available drives, type in list disk and press Enter.
- To perform a task on one of those disks, type in select disk followed by the disk number. For example: select disk 1. Then press Enter.
- Check the selected disk's particular partitions by typing list partition, then press Enter.
- To perform a task on a specific partition, type select partition, followed by the partition number. For example: select partition 2. Then press Enter.
- To delete a partition, type delete partition, then press Enter. *Warning* This will delete that partition and make its data very hard to recover. Only proceed once absolutely sure the right drive and partition has been selected. ALL data will be deleted.
You can also create partitions, format drives, convert file types, change drive letters, and a range of other drive management tasks. For a full list of available commands, check the Microsoft repository here.
Still running into issues with your hard drive or SSD? Bring it into your local Micro Center's Knowledge Bar. Our experts will be more than happy to walk you through your options. Schedule your free repair consultation today by visiting our Services webpage.
More from MC News
- Run AI Locally: The Best LLMs for 8GB, 16GB, 32GB Memory and Beyond
- Quantization Explained: Why the Same LLM Gives Better Results on High-End Hardware
- Why VRAM and Memory Bandwidth are Key for Powering Local AI
- Hands-on with NVIDIA DGX Spark: Everything You Need to Know
- How to Build a PC with a Hardline Water-Cooling Loop
- 3D Print a Mac Mini Monitor Mount
- The End Has Come for Windows 10: Four Tips to Make the Most of Windows 11
- Everything You Need to Know About WiFi 7
- Keyboard 101: Intro to Computer Keyboards
- Fix It Yourself: Talking to iFixit on Why Repairable Tech Matters
Jon Martindale is a freelance technology journalist and writer from Gloucestershire, UK. He's written for a range of publications over a 20-year career, including DigitalTrends, USNews, Forbes, and Lifewire, among many others. Over that time he's written countless how-to guides, best-of lists, hands-on reviews, and in-depth op/ed features.
He has been building and working with computers since his teens, and loves nothing more than trying out the latest components and gadgets to see what they can do. When he isn't staring at a monitor, he can be found chasing after with his two young children, playing board and roleplaying games, or walking his French bulldog cross.