
Build Your Own Weather Station with the Raspberry Pi Pico
This DIY weather station is a great way to learn new skills and get personalized weather reporting.Maker Projects

A do-it-yourself weather station is a great project for anyone looking to dip their toes into hobbyist electronics. It requires a bit of work across a range of skills, including soldering and programming, but nothing beyond a beginner level; a perfect way to get practical experience while learning something new.
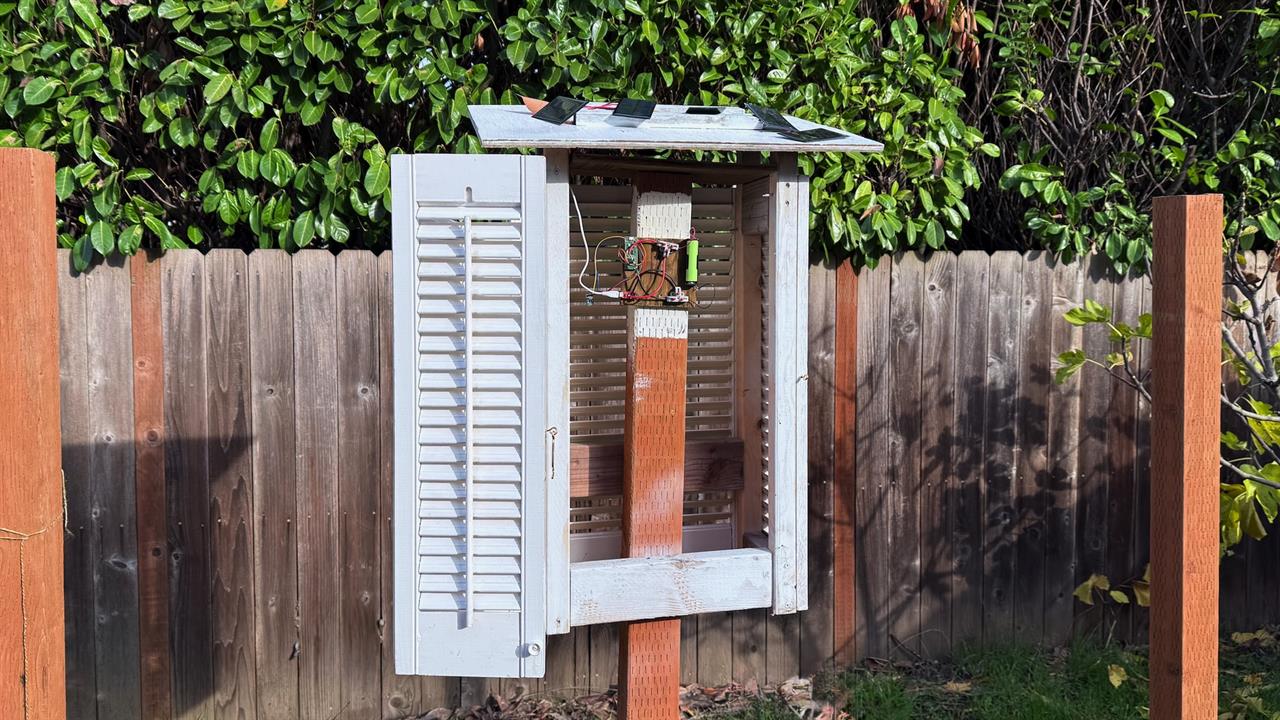 Photo: Matthew Smith
In this article I’ll guide you through building a weather station that can measure temperature, humidity, and barometric pressure, then report the results to a home server, for access anywhere you can access your home server.
Goals and hardware
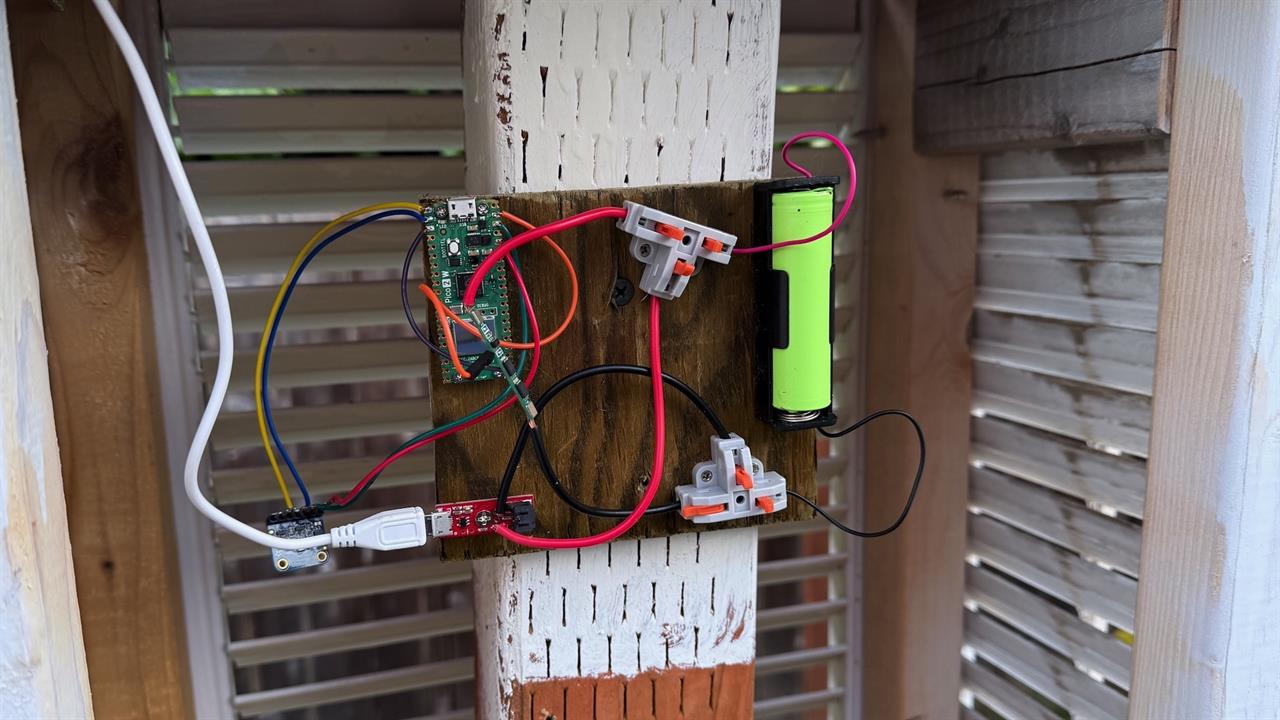 Photo: Matthew Smith
I built this weather station to measure the conditions in my garden. Though I live within a mile of an official weather station, I noticed my garden would often frost when the official temperature was above freezing. A weather station lets me check the conditions exactly where they matter most: my own garden
The core of this project is a Raspberry Pi Pico 2 W and a Bosch BME280 sensor. The Raspberry Pi is the brains of the operation and executes the code that reads the Bosch BME280 sensor. The build is modular and can include a variety of other parts, like soil sensors, depending on what you want to measure. I recommend you read the entire guide before you jump into anything, though your local Micro Center associates may also be able to help with parts questions.
Installing Micropython on the Raspberry Pi Pico 2 W
This project uses Python to program the Raspberry Pi Pico 2 W, so you’ll first need to install MicroPython to the hardware.
- Plug the Raspberry Pi Pico 2 W into a USB port on a computer. It should appear as a mass storage device, like a USB drive.
- Next, download the latest firmware for the Raspberry Pi Pico 2 W from the MicroPython website (or the version appropriate for your hardware, as all Raspberry Pi Pico boards are supported by Micropython). The download will be a .uf2 file.
- Drag and drop (or copy and paste) the .uf2 file into the Pico’s storage. It should install automatically and the Pico will no longer appear as a mass storage device.
If anything goes wrong, you can reset the Pico 2 W using the Bootsel button. Remove the Pico 2 W from power. Then press Bootsel, plug the Pico in to power, and release the Bootsel button. The Pico should reappear as a mass storage device.
Testing the Raspberry Pi Pico 2
Let’s test the Pico by running some basic Python code.
This is also an opportunity to get familiar with Thonny, the Python Integrated Development Environment (IDE) we’ll be using. If you’ve never used it before, don’t be intimidated by the fancy name, as Thonny is basically a text editor with some other bits attached.
- Download and install Thonny (it’s free and available for Windows, MacOS, and Linux).
- Plug the Raspberry Pi Pico 2 W into the computer and open Thonny.
- At the bottom of the open Thonny window, aligned towards the right, there is text that will say either “MicroPython (Raspberry Pi Pico)” or “Local Python 3” — if the latter is displayed, click on the text. That will open a menu where you can select “MicroPython (Raspberry Pi Pico)”.
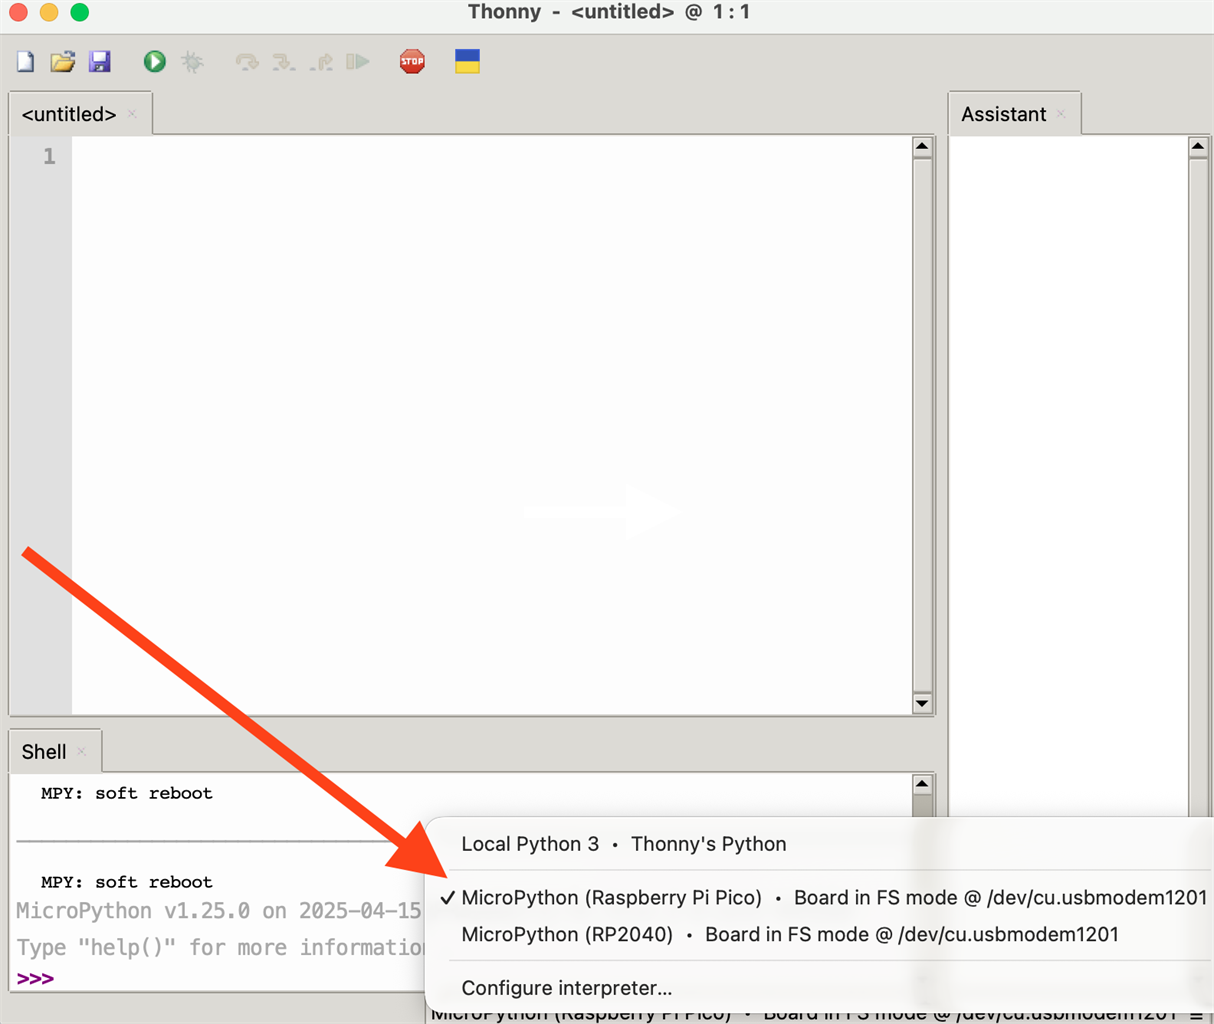 Photo: Thonny/Matthew Smith
We’re now ready to run code on the Pico.
- In Thonny’s main editing pane type a Hello World program, as shown in the screenshot below.
- Click the green Play button.
You should see the words “MPY: soft reboot” appear in the Shell, followed by your Hello World message.
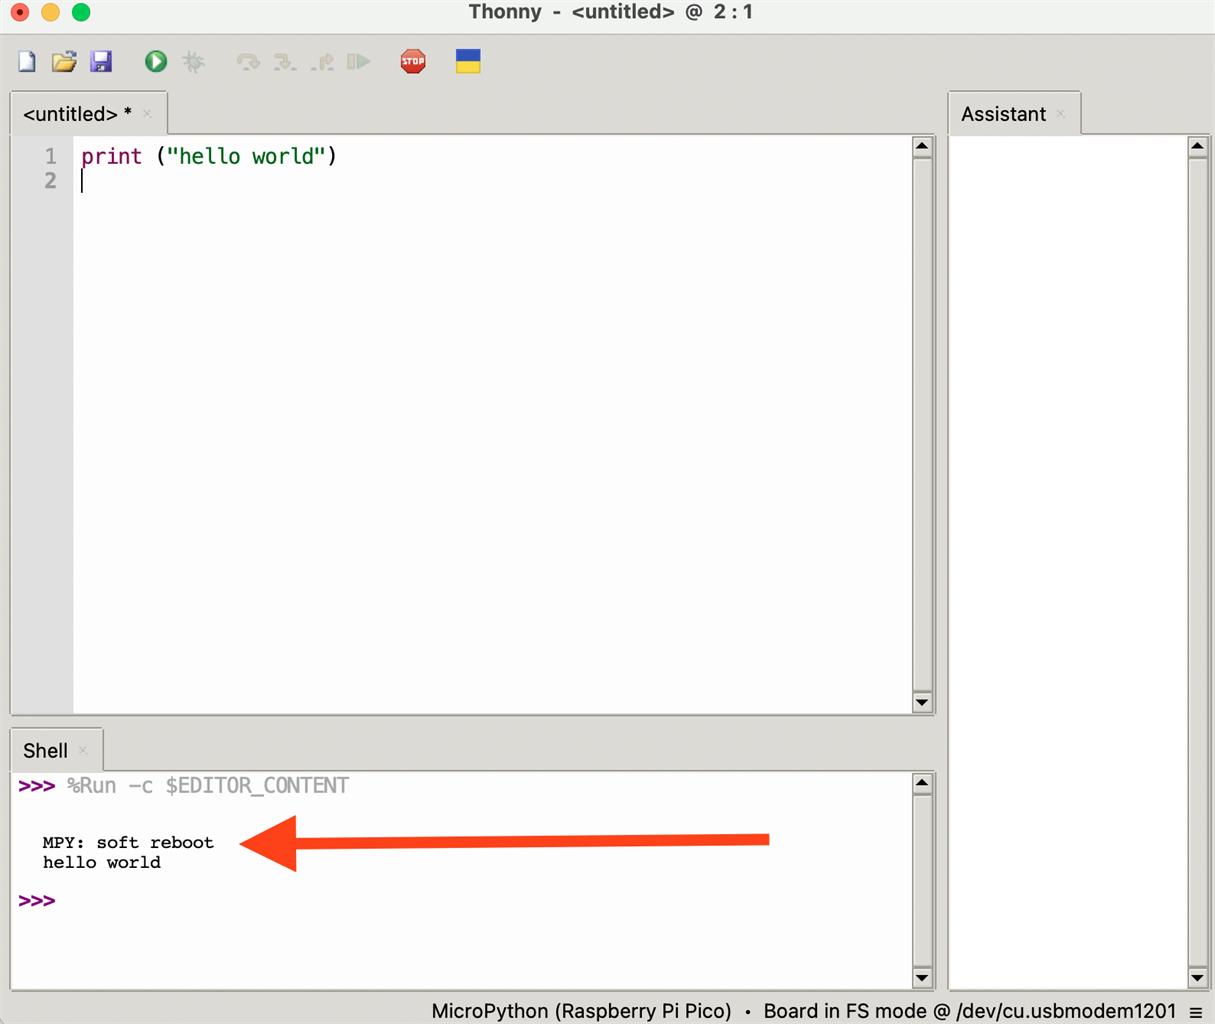 Photo: Thonny/Matthew Smith
This test shows that the Pico is working properly and will execute MicroPython code. With that confirmed, it’s time to connect the Pico and the BME280 sensor.
Preparing the Raspberry Pi Pico 2 W and Adafruit Bosch BME280 sensor
You’ll need to make a decision about how you want to connect the Raspberry Pi Pico 2 W and the Adafruit Bosch BME280 board.
The Raspberry Pi Pico 2 W can be purchased with or without a header. The header is a set of pre-soldered pins that let you attach female jumper cables and lets you assemble the project without soldering. While the jumper cables are less reliable than soldered connections, they’re fine for testing the project (my test setup worked for months before I soldered it together).
If you want to move straight to soldering your connections between the Pico 2 W and BME280, though, skip the headers. You’ll need a soldering iron and solder.
NOTE: Be sure to disconnect the Pico from your computer, or any other power source, before you proceed with connecting or soldering headers and wires.
The Adafruit Bosch BME280 is not available with a pre-installed header, but the version sold through Micro Center includes a header that can be soldered to the board.
Connecting the Raspberry Pi Pico 2 W and Bosch BME280 sensor
Now we’re ready to make the connections. Whether headers or soldered connections where chosen, it doesn’t change where the wires should be connected.
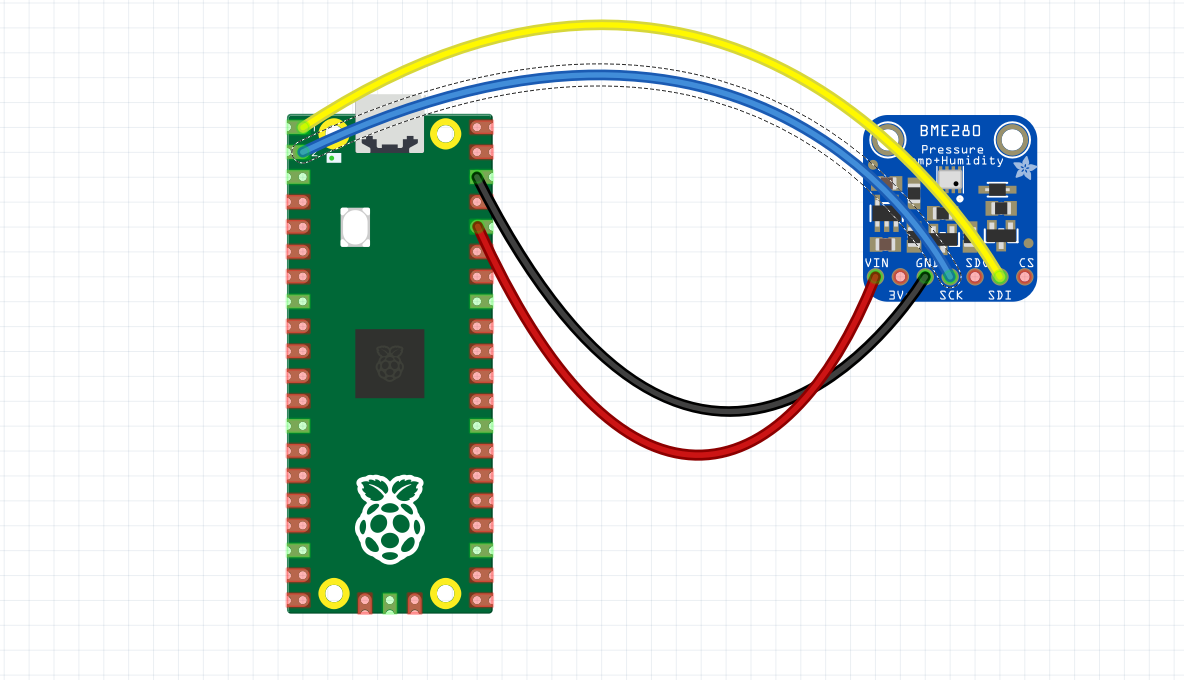 Photo: Matthew Smith
Attach jumper cables, or solder wires, between the Pico and BME280 sensor in the following arrangement:
- Raspberry Pi Pico 2 W Pin 1 -> Adafruit BME280 SDI: Handles data between the Pico and BME280.
- Raspberry Pi Pico 2 W Pin 2 -> Adafruit BME280 SCK: Carries a clock signal to synchronize communication.
- Raspberry Pi Pico 2 W Pin 36 -> Adafruit BME280 VIN: Power output from the Pico to the BME280.
- Raspberry Pi Pico 2 W Pin 38 -> Adafruit BME280 GND: Ground connection between the Pico and BME280.
This is specific to the Raspberry Pi Pico 2 W and the Adafruit Bosch BME280 board. You can use any Raspberry Pi Pico or BME280 board for this project, but the connections may be different.
Running Python to read the Bosch BME280 sensor
The Pico and the BME280 are connected. Now let’s use some code to go about reading temperature, humidity, and pressure from the sensor. To do so, you’ll need a package to read data from the BME280.
- Connect the Pico (with BME280 attached) to the computer and open Thonny.
- Go to the Tools menu and then click Manage Packages. A window with a search bar will appear.
- Search for “micropython-bme280” as seen below. NOTE: You need the MicroPython package. The standard Python package won’t work here.
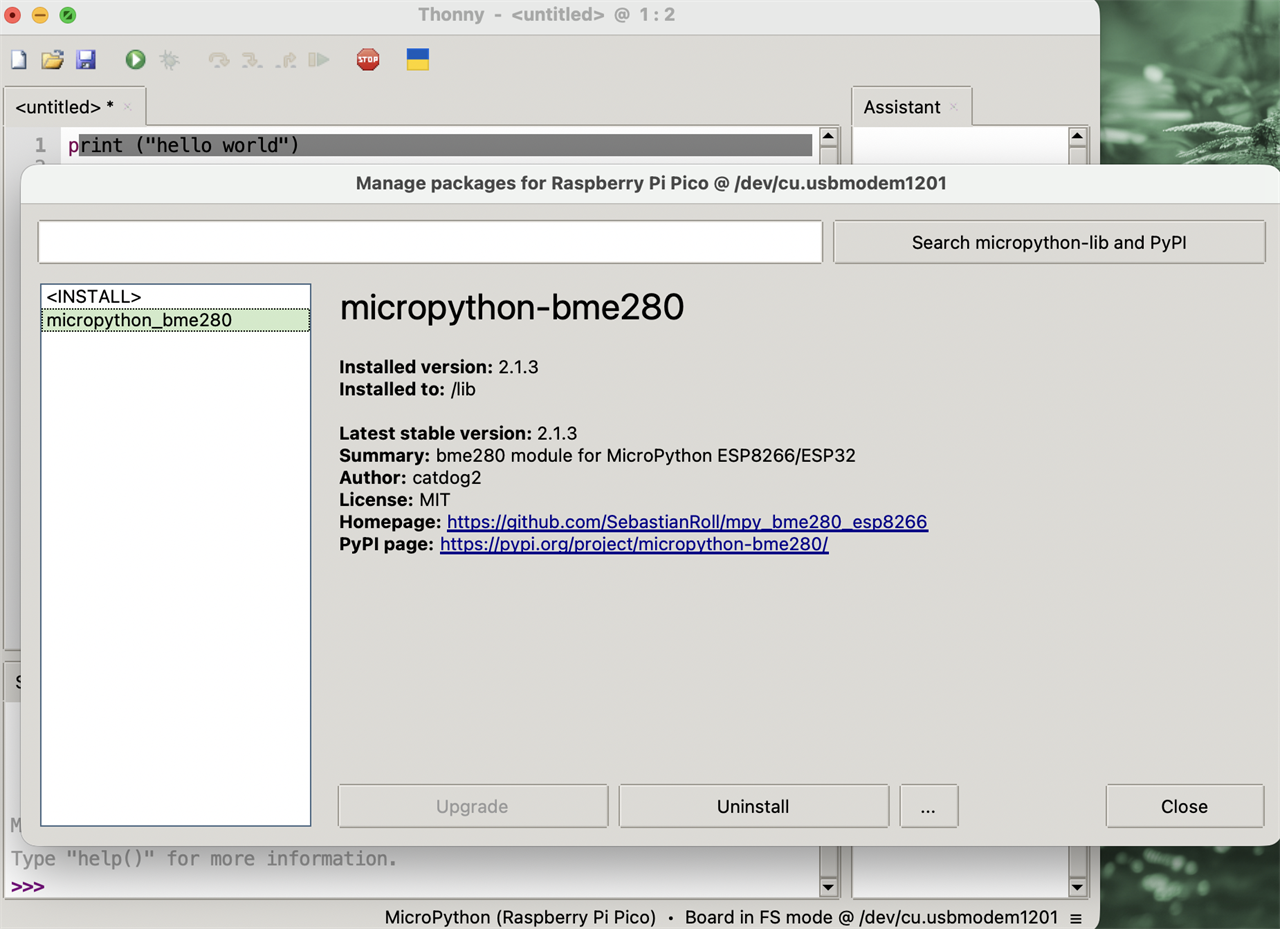 Photo: Thonny/Matthew Smith
- Once the package is installed, close out of the package manger and return to the main Thonny window.
- Now, place the below code into Thonny and then run it. NOTE: The i2c address information used in this code may be different if you’re not using the Adafruit BME280 board. Refer to the documentation of the board you’re using.
|
from machine import Pin, I2C import bme280 i2c = I2C(0, sda=Pin(0), scl=Pin(1), freq=400000) bme = bme280.BME280(i2c=i2c, address=0x77) print(bme.values) |
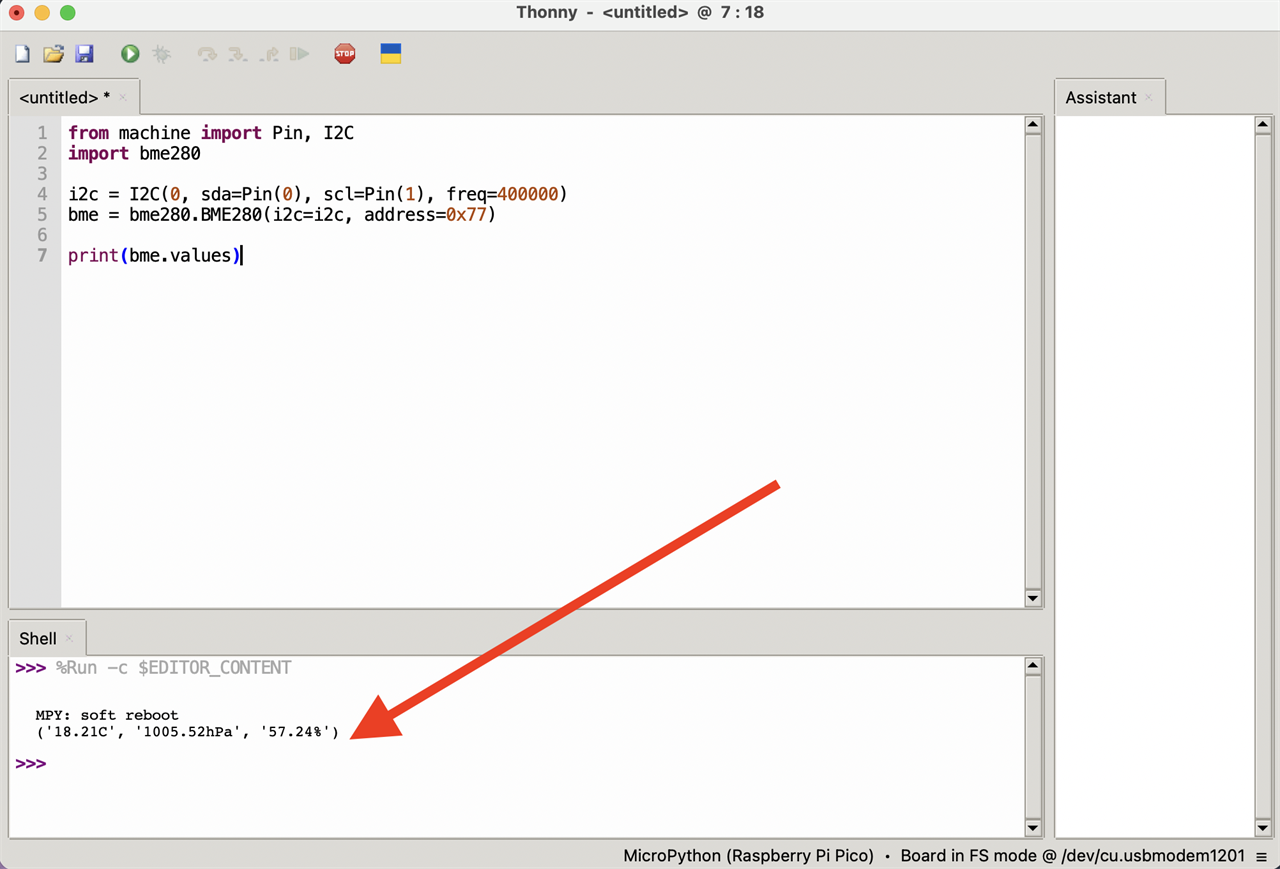 Photo: Thonny/Matthew Smith
You should see a boot message appear in the Shell, followed by the temperature, humidity, and pressure. Do NOT disconnect the Pi at this point, as the code has not been saved!
Making sensor data visible on your local network
If you successfully completed the last step, your BME280 sensor is now communicating with your Pico and you can go about making the sensor data visible on your local network. To do so, we’re going to change some of the code we just ran.
- With the Pico (with BME280 attached) still connected to the computer, navigate back to Thonny
- Remove the code you used before and replace it with the following code. Note that this code includes configuration data for your Wi-Fi network including the WIFI_SSID and WIFI_PASSWORD. Insert the correct network name and password for your local Wi-Fi network:
|
import network import socket from time import sleep from machine import Pin, I2C import bme280 # WiFi settings, add your Wifi network name and password here WIFI_SSID = 'your_wifi' WIFI_PASSWORD = 'your_password' # Setup sensor i2c = I2C(0, sda=Pin(0), scl=Pin(1), freq=400000) bme = bme280.BME280(i2c=i2c, address=0x77) # Connect WiFi wlan = network.WLAN(network.STA_IF) wlan.active(True) wlan.connect(WIFI_SSID, WIFI_PASSWORD) while not wlan.isconnected(): sleep(1) print('Connected! IP:', wlan.ifconfig()[0]) # Start web server s = socket.socket() s.bind(('0.0.0.0', 80)) s.listen(1) while True: conn, addr = s.accept() conn.recv(1024)
# Read sensor temp_c = float(bme.values[0].replace('C', '')) temp_f = (temp_c * 9/5) + 32 humidity = bme.values[2] pressure = bme.values[1]
# Send webpage html = f"""HTTP/1.1 200 OK Temperature: {temp_f:.1f}F ({temp_c:.1f}C) Humidity: {humidity} Pressure: {pressure} """ conn.send(html) conn.close() |
- Once finished, run the code.
You will see the sensor data gain appear in Thonny’s Shell, along with a message indicating a successful Wi-Fi connection accessible at the given IP address.
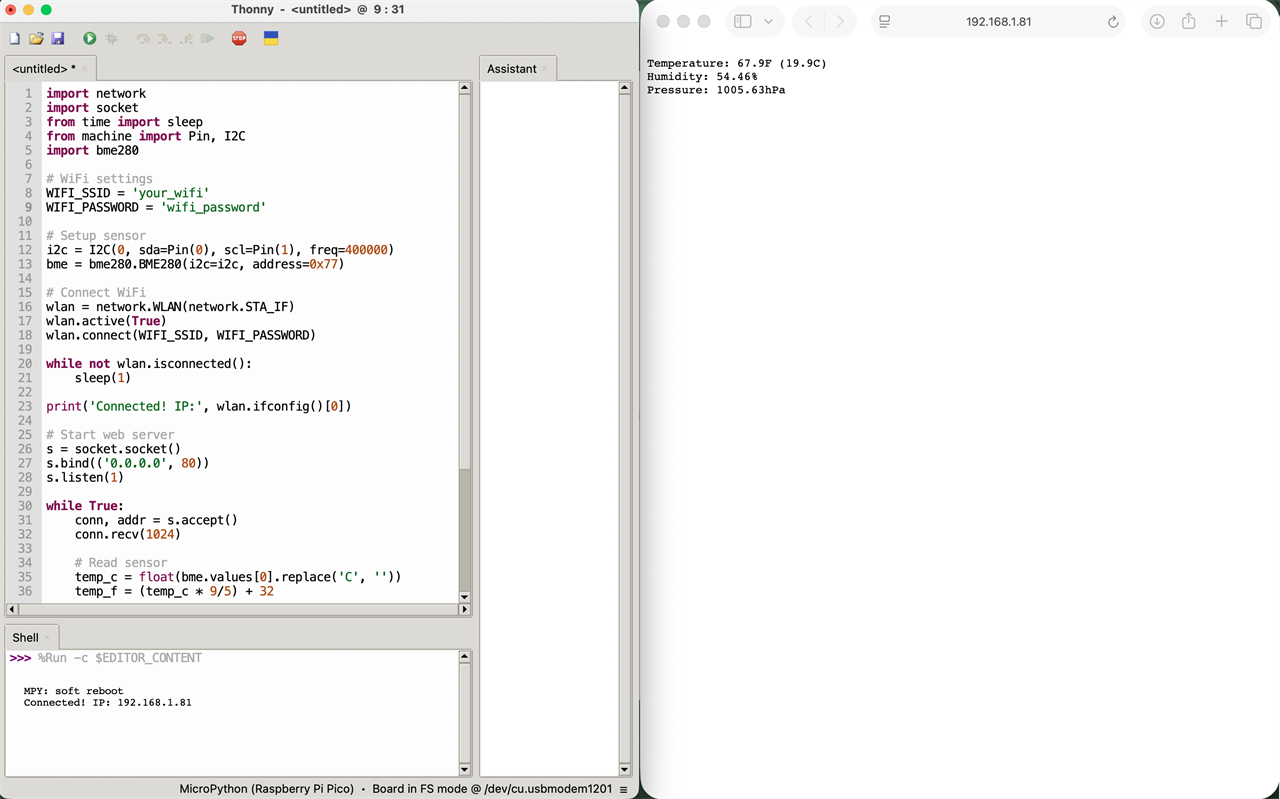 Photo: Thonny/Matthew Smith
Access that IP address via a web browser on a computer, smartphone, or tablet and you should see the BME280’s sensor data appear in plain text.
Writing code to the Pico
You now have code to read the BME280 sensor running on the Pico, but it’s not yet saved to the Pico.
- Click the Save icon (which looks like a floppy disk).
- A window will open asking if Thonny should save to the computer or to the Raspberry Pi Pico. Select the Raspberry Pi Pico.
- Next, Thonny will ask for a file name. For this project, name the program “main.py” without the quotation marks, as the Pico will automatically run “main.py” when it is powered.
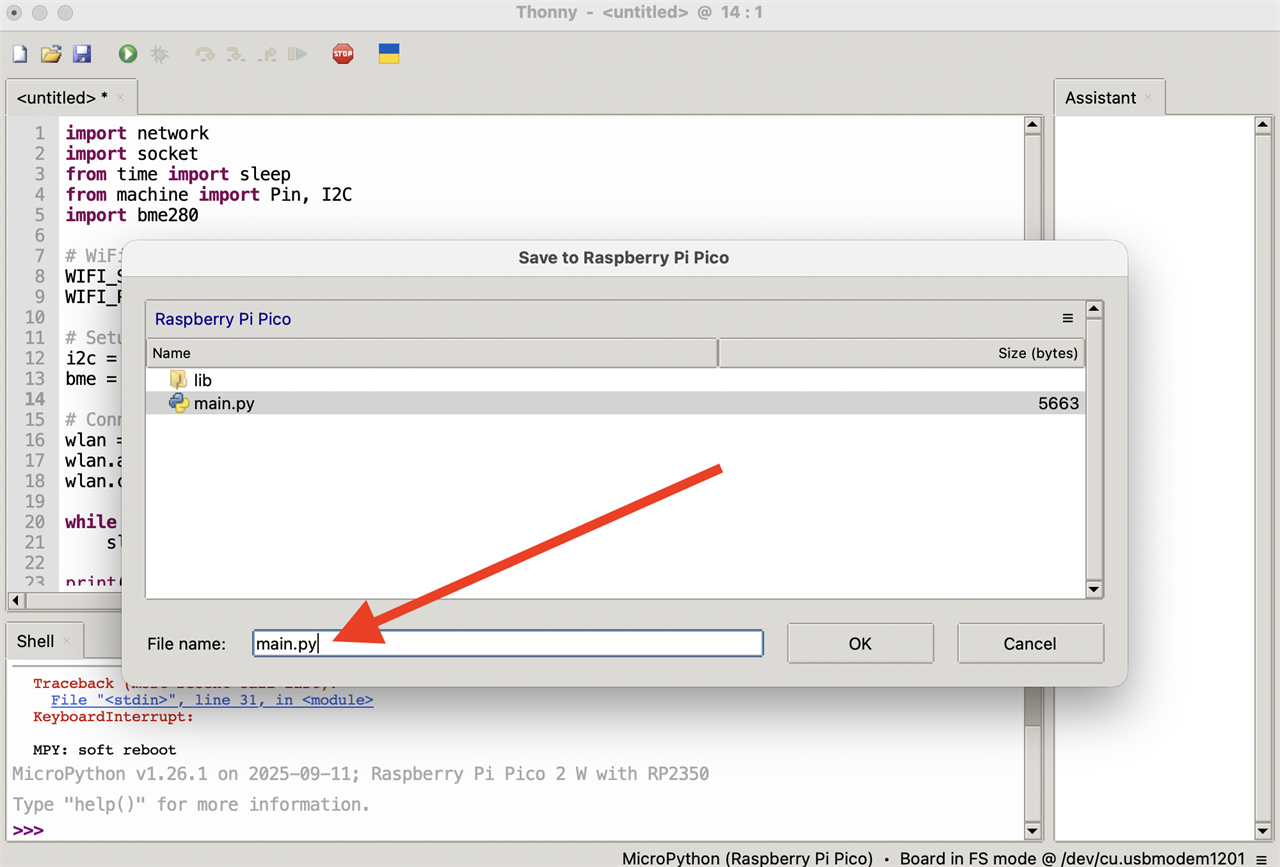 Photo: Thonny/Matthew Smith
Once that’s saved, you can disconnect the Pico from your computer and connect it to another power source. The Pico should boot and run the code automatically.
To confirm the code has been properly saved to the Pi and it is receiving power, use a web browser to visit the IP address you assigned to the weather station in your code. It should be displaying all relevant sensor data.
Storing sensor data on your local network
If you only care to see the current weather data, Congratulations! You’ve finished your very own Raspberry Pi weather station and can go set it up wherever you’d like it to be. We’ve got some tips for placement, housing, and powering your new station further on, but we also have a few more tips to make your weather station a bit more useful. So, if you’re happy with your project, skip ahead. Otherwise, read on to learn how to create a record of sensor data.
While a record could possibly be stored on the Pico itself, or even a storage device attached to the Pico, that’s not likely to be practical as this will be (almost certainly) used outside and checked remotely.
Instead, it’s a better idea to send data from the Pico to a server on your local network.We have an indepth guide for setting up your first home server, but I personally recommend using a headless server running Ubuntu Server. I installed it to an elderly Intel NUC, but anything that can run Ubuntu Server (including a Raspberry Pi!) should be adequate.
Once you have a home server set up, return to Thonny with the Pico connected and run the code below. In addition to the Wi-Fi network configuration information, which must still be filled out, you’ll need to add configuration data for the server host. That includes the server’s IP address and open port, plus the name of the database used to store your weather data.
The code for this is much longer than the prior examples, so rather than reproducing it here, I’ll link to the Python file.
The new code includes a sleep-wake cycle so rather than operating continuously, the Pico now wakes every five minutes (the exact interval can be changed), connects to Wi-Fi, reads the BME280 sensor data, transmits that data to the server, and goes back to sleep.
This isn’t strictly necessary, but it’s useful if you plan to use the weather station on battery or solar power. It also prevents the weather station from throwing tons of weather data at the server.
More on power and sensor accuracy
You now have a weather station that can not only capture the weather in the moment, but also lets you browse historical trends.
However, there’s still a couple things to consider.
Housing
Most pressingly, you’ll need to house the weather station. The sensor needs to be shaded from sunlight but also needs excellent ventilation.
A Stevenson Screen is the ideal instrument shelter for most weather stations. It’s a large box with vents on all sides. Unfortunately, a high-quality Stevenson Screen is surprisingly expensive (we’re talking at least hundreds, and possibly thousands), so it’s not a great option.
I experimented with several alternatives. I tried a small, vented plastic enclosure, but that was very inaccurate, so I built a larger vented wooden enclosure measuring about a foot on each side. I was annoyed to discover that was also inaccurate, so I built an even larger DIY Stevenson Screen out of pine wood and old shutters from a used goods store.
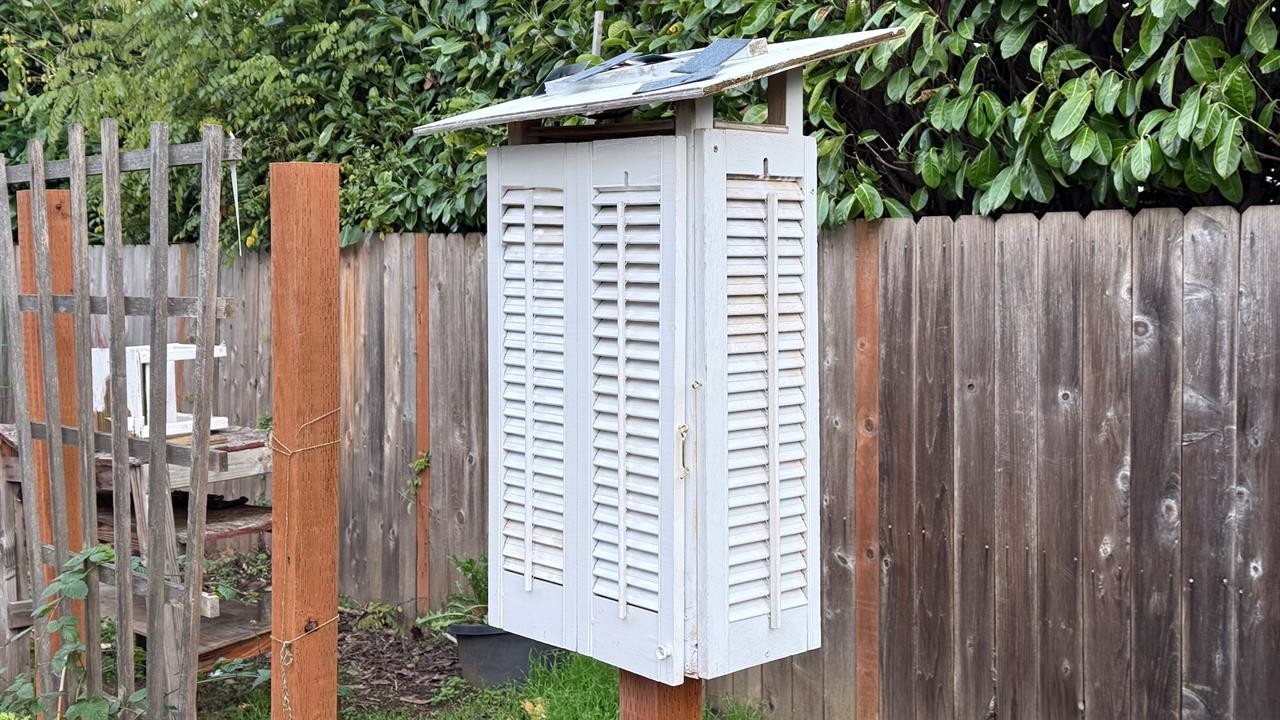 Photo: Matthew Smith
These experiments led me to conclude I can’t expect accurate readings from the small enclosures you might find available online. Even the one I’m now using might be a tad too small, though I won’t know for sure until summer comes back around. If you come up with an effective solution, let us know in the comments or on social media.
Power
The Raspberry Pi Pico 2 W often uses well less than a watt of power, but it still requires juice.
The USB port is the easiest way to power the Pico. You can use an extension cord to connect the station to an outdoor power outlet, connect a USB-compatible battery, or add a USB-compatible solar panel.
Alternatively, you can power the Pico by connecting a power source directly to the power input pins. It’s more complicated than using USB but lets you customize the station to your needs. It’s also less expensive; A 3.7V Li-Ion battery, a charge controller, and a couple cheap solar panels will cost you less than $30, while a similar USB battery and solar panel can cost several times more.
Physical placement
Ideally, the weather station should be at least a couple meters, or roughly six feet, off the ground. and at least 20 feet from any obstruction, building, or concrete surface. The weather station’s housing should be placed away from shade, though the sensor itself shouldn’t receive direct sunlight.
Of course, odds are you won’t be able to fulfill all these requirements -- I certainly couldn’t. Do the best that you can and keep these factors in mind as you read your weather reports.
Conclusion
And that’s it! You now have a weather station that can not only read temperature, humidity, and pressure data, but also transmit that data over your local network and store it on your own server.
That, however, isn’t necessarily the end of the journey—which is the great thing about going the DIY route. In the future I plan to experiment with transmitting data over a Meshtastic network. I also want to add a soil temperature and humidity sensor, which would help me decide when it’s time to plant in the garden.
More from MC News
- Quantization Explained: Why the Same LLM Gives Better Results on High-End Hardware
- Why VRAM and Memory Bandwidth are Key for Powering Local AI
- Keyboard 101: Intro to Computer Keyboards
- Fix It Yourself: Talking to iFixit on Why Repairable Tech Matters
- The Local LLM Your Laptop's Been Waiting For
- Gemma vs Qwen: Which Local AI is Best?
Matthew S. Smith is a prolific tech journalist, critic, product reviewer, and influencer from Portland, Oregon. Over 16 years covering tech he has reviewed thousands of PC laptops, desktops, monitors, and other consumer gadgets. Matthew also hosts Computer Gaming Yesterday, a YouTube channel dedicated to retro PC gaming, and covers the latest artificial intelligence research for IEEE Spectrum.