
DIY Projection Mapping: How to Turn Your Home Studio into an Immersive Art Installation

You might have seen one of the currently trendy "immersive" exhibits touring the country, where the walls of a warehouse are covered in floor-to-ceiling projections of sunflowers or Starry Nights. It's an impressive effect, usually powered by industrial-grade hardware and six-figure budgets.
But the core technology — called projection mapping — is surprisingly accessible. In our latest Micro Center video, which you can watch above, we set out to prove that you can turn a corner of your home studio into a dynamic art installation using a mid-range projector and some clever, free-to-use software.
The software side
The brains behind most professional mapping projects is a program called TouchDesigner. It's what's known as a node-based visual programming language. And inside TouchDesigner is a tool called Kantan Mapper that makes it easy to draw digital masks directly over the physical objects in your room. Once you've "mapped" a surface — whether it's a wall, a shelf, or a custom-built prop — the software ensures your video content stays perfectly within those lines.
You can see the step-by-step UI breakdown in the video, which is where the node logic starts to make sense.
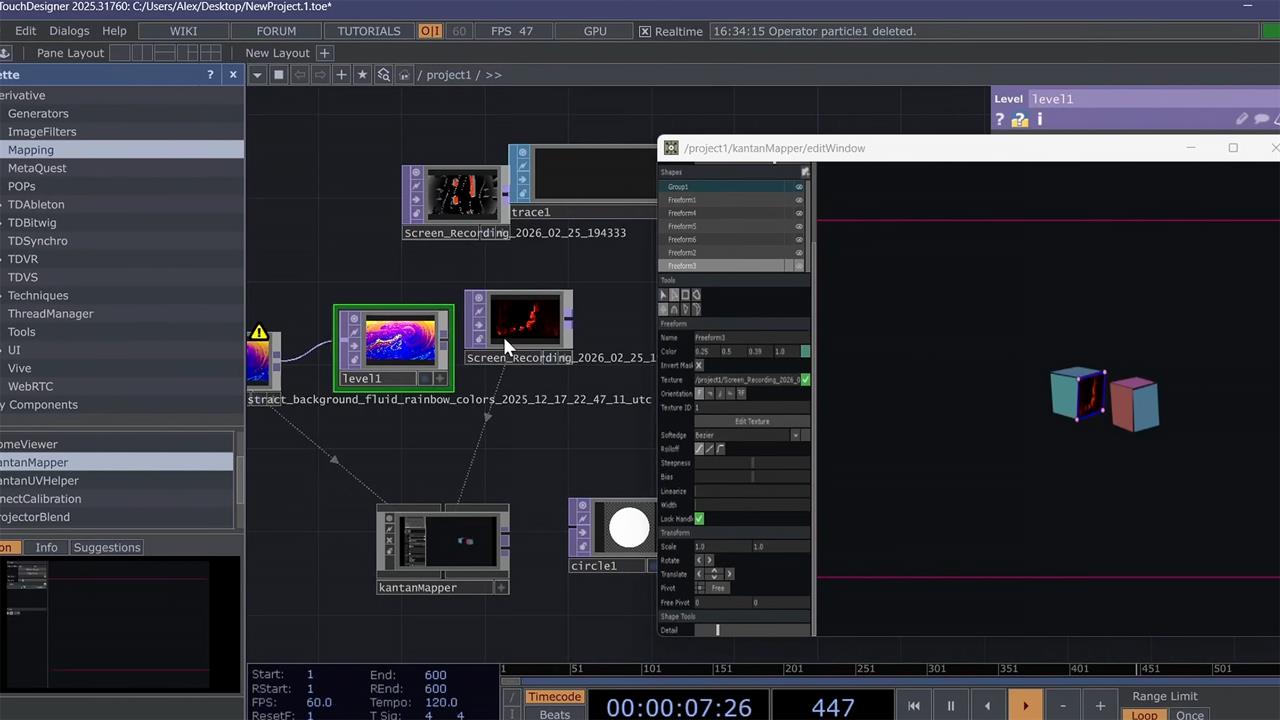
Screenshot: Micro Center
The projector
You don't need a cinema-grade projector to get started, but you do need to be realistic about your environment. In the studio, we used an Epson projector pushing about 3,000 lumens at 1080p. At around $550, it's a solid middle-ground option that provides enough brightness to hold its own against a bit of ambient light.
Projection mapping relies on contrast. Because a projector can't actually project the color "black" — it's simply the absence of light — any light bleeding into the room will wash out your digital illusions. A higher-lumen count gives you more headroom for bold images.
Mapping the third dimension
The real magic happens when you move away from flat walls. In the video, we decided to map out the individual faces of a white cube to create real-life Minecraft blocks.
This is where the hands-on nature of the project really shines. By positioning the projector at an angle, we were able to hit multiple sides of the cube simultaneously. In the software, we assigned different textures — like a grass block or a TNT block — to each face. And because TouchDesigner is designed for live performance, you can eventually hook up motion sensors or MIDI controllers to make your art react to sound or movement.
Watch the full video above to see the setup in action and learn how to wire up your first nodes.
More from MC News
- Run AI Locally: The Best LLMs for 8GB, 16GB, 32GB Memory and Beyond
- Quantization Explained: Why the Same LLM Gives Better Results on High-End Hardware
- Why VRAM and Memory Bandwidth are Key for Powering Local AI
- Why AMD's 3D V-Cache is Having a Moment
- The Micro Center Monitor Buying Guide: Part 1
- Keyboard 101: Intro to Computer Keyboards
- Fix It Yourself: Talking to iFixit on Why Repairable Tech Matters
- Hands-on with NVIDIA DGX Spark: Everything You Need to Know