
How to Use a Local LLM in Visual Studio Code

Photo: Jacob Bobo
Coding is arguably the use case for large language models (LLMs) in 2026. Companies like Anthropic and OpenAI are betting their entire futures on it. However, the increased coding ability of leading LLMs has come with increased costs. It's not difficult to rack up a few hundred dollars of API charges when using the best (and most expensive) models hosted in the cloud.
You do have another option, however. You can instead use a local LLM on your own PC. This is a little more complex to setup, and the capabilities of the model won't match Anthropic and OpenAI's best. But small models are still useful. They're also free to download and use. In this guide I'll walk you through installing and using a local LLM for coding in Visual Studio Code.
Installing an LLM for use on your PC (with a command line)
Before you can use an LLM in Visual Studio Code (or any other local applications) you'll need a way to execute and serve the LLM. In this guide we're going to use Ollama. It's free, widely available, and many extensions for Visual Studio Code treat it as the default for accessing a local LLM.
To begin, you'll need to launch a terminal (on Linux or MacOS) or Windows PowerShell. Then you'll need to use the following install command.
Linux/MacOS: curl -fsSL https://ollama.com/install.sh | sh
Windows: irm https://ollama.com/install.ps1 | iex
Alternatively, MacOS and Windows users can download and install Ollama from its website.
Once installed you can launch Ollama by typing ollama in the terminal. After a moment you should see several options, including Chat with a model.
That's not what we want, however, so press escape to return to the command line. Let's now download a model. You can use any that you choose for this guide; as an example I'll use Qwen3.5-9B, as it's a small model that can fit in about 12GB of memory (the model itself is under 7GB quantized, but we need room for the context window, too). You can use Ollama's website to search for other models if you'd like.
To download Qwen3.5-9B use the command: ollama pull qwen3.5:9b
Note: If you find performance is poor, try ollama pull qwen3.5:4b instead.
The download will take at least a few minutes to complete. Keep the terminal open. Eventually the download should end with success. You can confirm by typing ollama list in the terminal. The model that you downloaded should now appear.

All screenshots by Matthew Smith
While you're at it, also pull the following models: nomic-embed-text:latest and qwen2.5-coder:1.5b-base. These will be needed later.
Conveniently, Ollama automatically serves the model once it's installed. It is bound to 127.0.0.1:11434 by default.
You can confirm Ollama is running and available by typing curl http://localhost:11434, which should return Ollama is running (or on Windows, a longer diagnostic containing the same).
If for some reason it's not running, you can start it with ollama serve.
Installing Visual Studio Code and a local AI extension
You'll of course need Visual Studio Code, and you can download it online. It's available for Windows, Linux, and MacOS.
Once it's installed and open, turn your attention towards the vertical menu bar on VS Code's left side (officially titled the Activity Bar). Here you'll see an icon of a box with one side offset. Click it to open the Extensions Marketplace.
We're going to use Continue, a popular open source AI coding extension. Click the Install button and wait a few moments. Once installed, the Continue extension icon will appear in VS Code's Activity Bar.
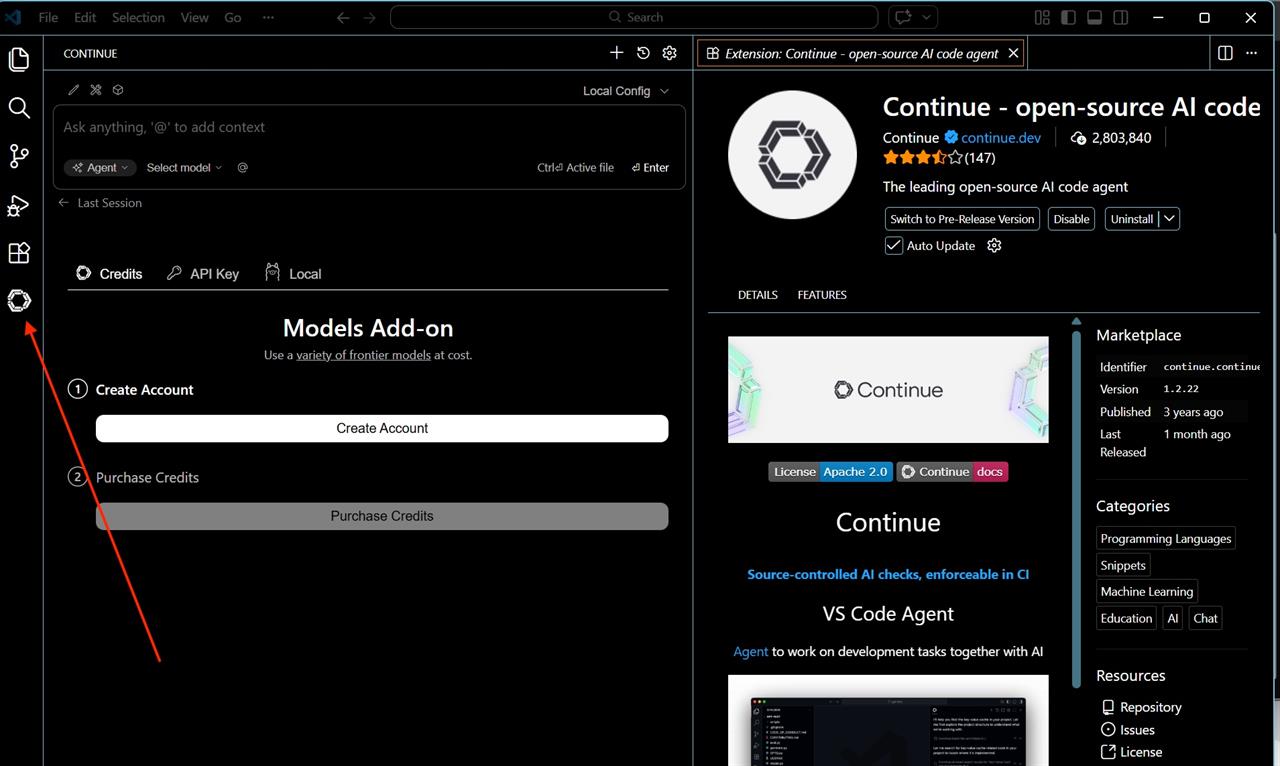
Note: While we'll use Continue here, dozens of extensions exist. Ollama will function with most, though details of configuration vary.
Clicking the Continue icon will open the extension.
You'll now see a chat interface, but you're not set up yet. Beneath the chat interface find the menu option for local, which also happens to include the Ollama icon. Click it to open.
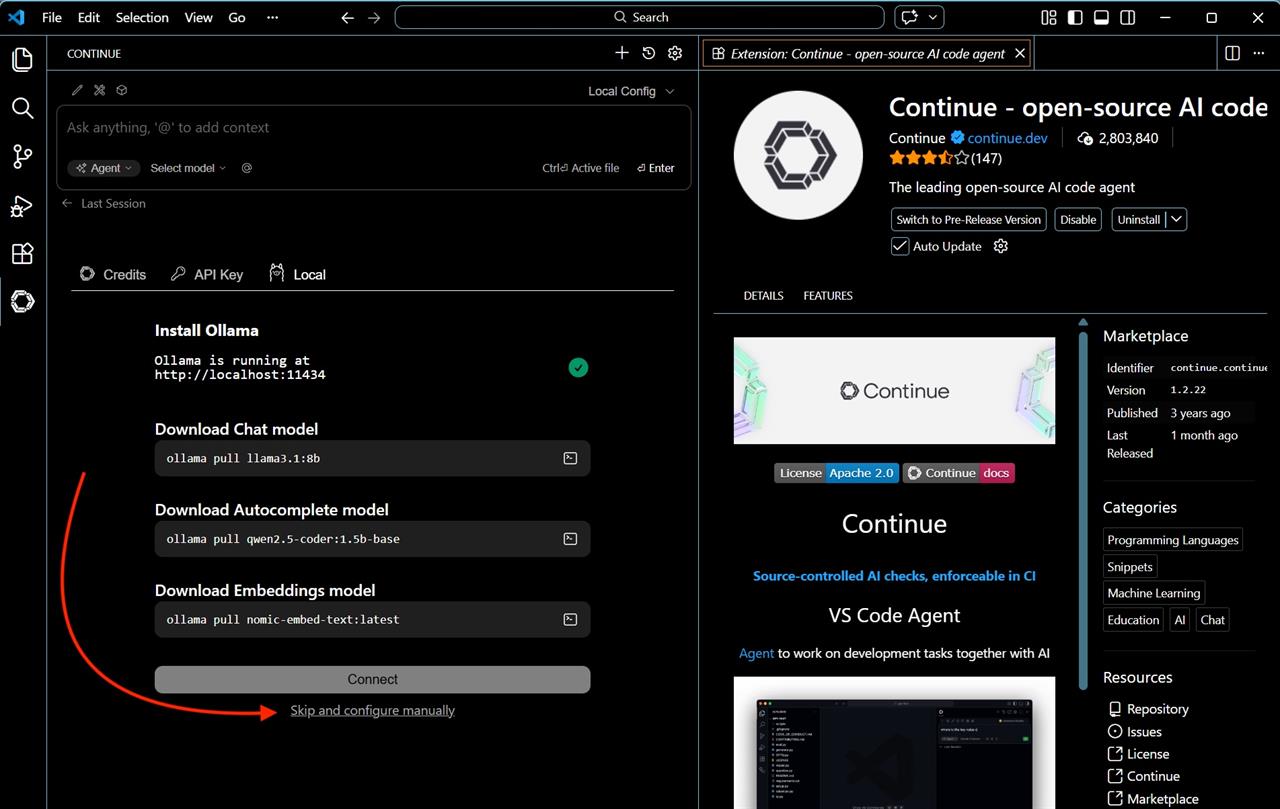
You will now see instructions for installing and starting Ollama. However, the instructions make some assumptions about the models you're using. So instead click Skip and configure manually.
This is going to open a configuration file in VS Code. It's also where things get a little complicated.
Configuring Continue
The default config file will look like this.
name: Local Config
version: 1.0.0
schema: v1
models:
- name: Llama 3.1 8B
provider: ollama
model: llama3.1:8b
roles:
- chat
- edit
- apply
- name: Qwen2.5-Coder 1.5B
provider: ollama
model: qwen2.5-coder:1.5b-base
roles:
- autocomplete
- name: Nomic Embed
provider: ollama
model: nomic-embed-text:latest
roles:
- embed
Let's break this down.
The name, version, and schema fields of the top three lines allow you to name your file, but they are not relevant for our purposes today. You can change the name from Local Config if you'd like, though.
We want to look at the fields below models.
Each model listed has several lines, each of which must be filled out.
Here is what each does, and how to change them. Remember, this is a config file, so it's important to be exact. An erroneous space, missing letter, or extra line break can cause problems.
- name: This is the name that will appear in Continue's interface. It's simply a label; you can call the model whatever you'd like.
- provider: This should be exact: ollama.
- model: This also needs to be exact. If you can't remember what a model is called, open a terminal and type
ollama list. The model name in the name field is what you want to put into the model field in your Continue config file. - roles: These fields decide which models will be used for specific tasks. The roles include chat (chatting with the model), edit (generating and editing code), apply (applying code edits), autocomplete (autocomplete code snippets), and embed (for codebase awareness).
For this tutorial, we'll be using Qwen3.5 9B alongside Qwen2.5-Coder 1.5B and Nomic Embed. The config file default is already set up for the latter two, so we only need to change the field that currently lists Llama 3.1 8B.
Your config file should ultimately look like this.
name: Local Config
version: 1.0.0
schema: v1
models:
- name: Qwen3.5 9B
provider: ollama
model: qwen3.5:9b
roles:
- chat
- edit
- apply
- name: Qwen2.5-Coder 1.5B
provider: ollama
model: qwen2.5-coder:1.5b-base
roles:
- autocomplete
- name: Nomic Embed
provider: ollama
model: nomic-embed-text:latest
roles:
- embed
Make sure to save your config file when you're finished.
Using Continue
Returning to Continue, you should now see the Qwen3.5 9B model loaded and selected in the drop-down menu below the chat interface.
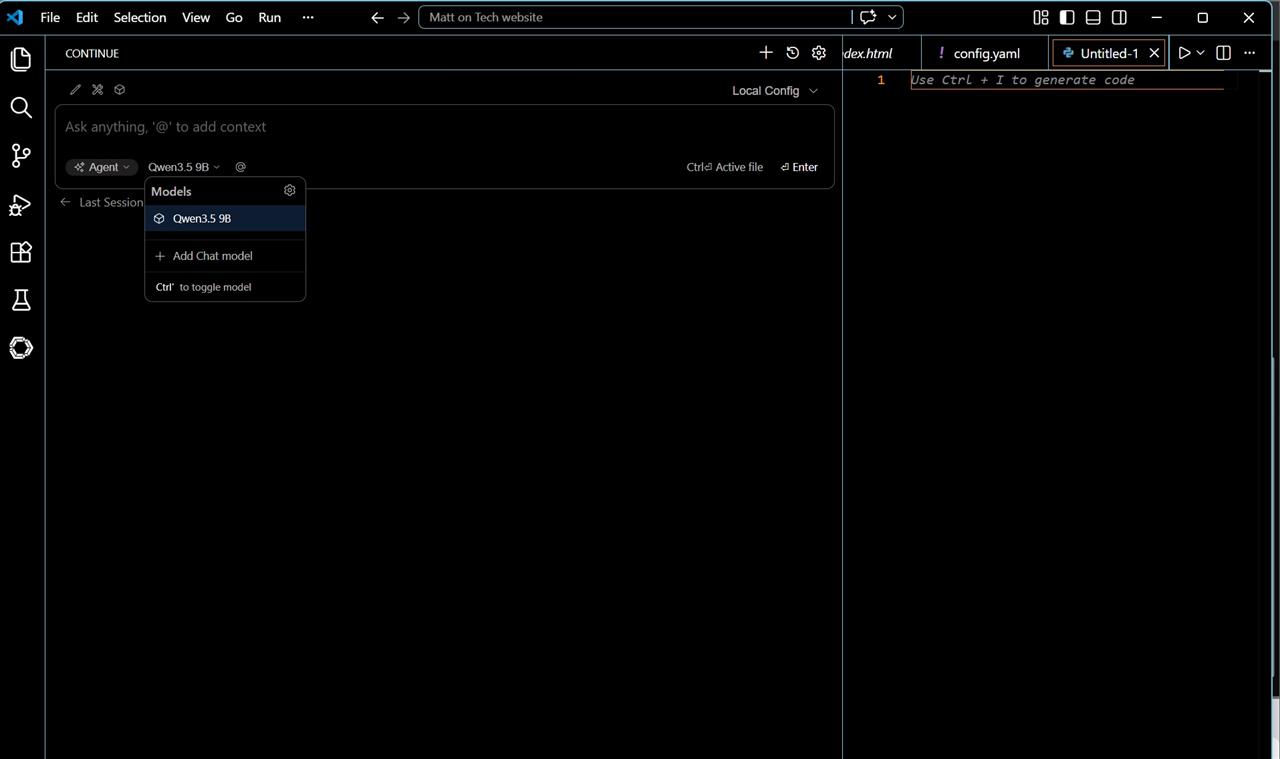
To the left of this you'll also see another field. Clicking this will reveal several options including Chat, Plan, and Agent. The mode you choose does matter. Chat is a basic chat experience. Plan is used to plan a project before proceeding. Agent gives your LLM access to various tools to complete autonomous actions including file reads and writes.
If you type @ in the chat window, you'll see a list of files that are available in the project you currently have open. The project I have open is my personal website. So, by entering the prompt "@index.html What can you tell me about this file," the agent is able to read the file and summarize it for me.
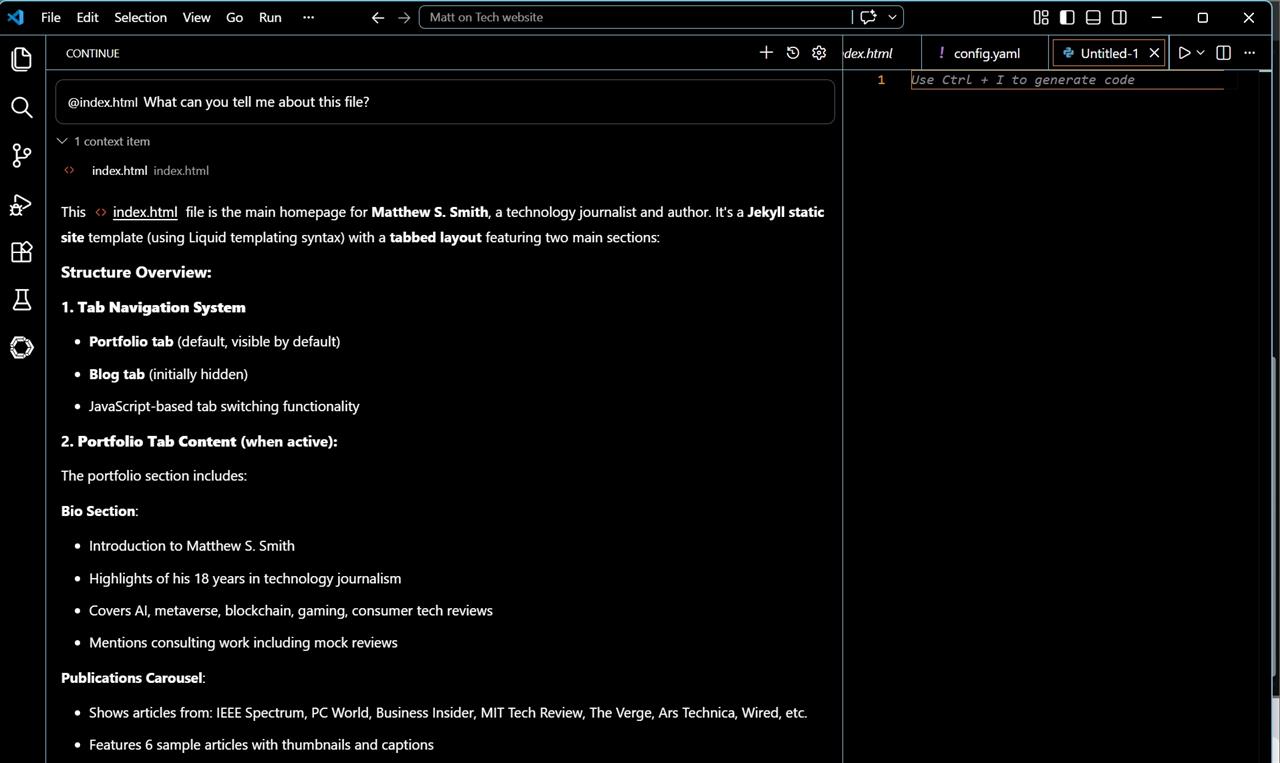
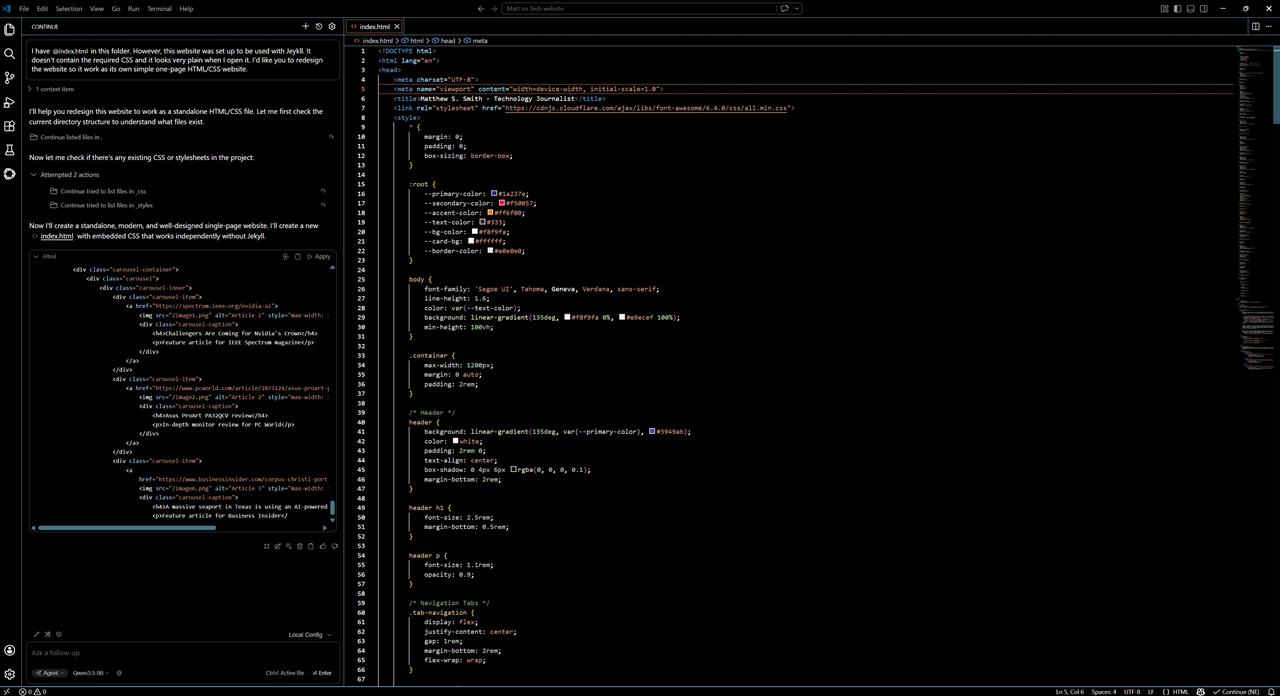
I can also change the file with a prompt.
For example, in the image below, I've asked it to alter the website from using Eleventy to a simple website with HTML and CSS. Agent Mode checked files to see what might already exist and then changed my index.html so that the website worked on its own.
Because we've set up autocomplete, Continue will also provide code completion. As an example, you can open a file and enter some Python, such as def add_numbers and see what appears. Qwen2.5-Coder is a small model, so it should only take a couple moments for an autocomplete to show up.
There's more Continue can do, of course. I recommend checking out the Continue docs, particularly those on Agent Mode, which is likely what you want to use if you plan to do some vibe coding powered by your local LLM.
Just how good is a local LLM for coding, anyway?
Now you're ready to use your local LLM for coding in VS Code. But what kind of results should you expect?
That depends a lot on the model that you use. Better models generate better results, and the differences can be significant.
For example, I asked Qwen3.5 2B and Qwen3.5 9B to "Please create a basic HTML and javascript program that acts as a to-do list."

As you can see, there's quite a bit of difference between the two examples.
The Qwen3.5 2B version is more basic, though that's arguably a fine interpretation of the prompt. However, Qwen3.5 2B wasn't clever enough to know a To Do list needs a way to remove items, and a way to mark them complete, as well as a way to add them. Qwen3.5 9B understood that and provided a more complete set of features from the start.
Ideally, you'll want to use an even smarter model than Qwen3.5 9B, though this will be difficult on most consumer PCs. Better options include Alibaba's Qwen3.6-35-A3B and Google's Gemma 4-26B-A4B, but both will require 32 to 36GB of memory to run comfortably with a large context window.
Whatever you use, you'll need to moderate your expectations for agentic coding. In my experience, local LLMs that can be practically used on consumer hardware (even very high end consumer hardware) aren't amazing at agentic tasks yet. Tool calls can fail and the models can fall into reasoning loops.
If you want to create something basic—like the To-do list—it's fine. Anything more complex requires a human in charge.
Using local LLMs on a networked machine
One way to improve the quality of the local LLM you can access is to buy or build a machine for that purpose. It might be a desktop with an NVIDIA RTX 5090, or it might be an AI mini-workstation like the DGX Spark. Your AI workstation can then be used as a local AI server.
I used an NVIDIA Blackwell desktop to host and serve several models including Qwen3.5-122B-A10B (which runs best with at least 96GB of memory). The model was accessed on other networked PCs, including in extensions such as Continue.
To do this, first install Ollama on the host machine using the instructions earlier in this guide.
Once you have Ollama and a model installed, use the command OLLAMA_HOST=0.0.0.0:11434 ollama serve. That starts Ollama and makes it accessible to other networked machines.
You'll also need to make the Ollama host accessible to Continue by editing your config file. Here's an example of how to do it:
- name: Qwen3.6 35B
provider: ollama
model: qwen3.6:35b
apiBase: http://x.x.x.x:11434
The placeholder x.x.x.x must be replaced with the network IP address of your host PC. You can also assign roles, just as you would a local model.
Conclusion
Using a local LLM with VS Code isn't going to replace a highly autonomous vibe coding workflow based on GPT-5.5 or Claude Opus 4.7. However, it can provide a ton of assistance both to experienced coders who just want a little help grinding through repetitive tasks, or to new coders who want to avoid the full vibe-coding path and instead interact with code more directly while also letting AI take the reins at times.
And, of course, the tokens are "free" (or, at least, as inexpensive as your home electrical utility allows). That alone might be appealing as leaders like Anthropic are increasing the cost to access models via the API with each new iteration.
More from MC News
- Run AI Locally: The Best LLMs for 8GB, 16GB, 32GB Memory and Beyond
- Quantization Explained: Why the Same LLM Gives Better Results on High-End Hardware
- Why Context Length, Not AI Model Size, Is Your Biggest VRAM Problem
- How to Use LM Studio to turn your PC into an AI Server
- Why VRAM and Memory Bandwidth are Key for Powering Local AI
- Keyboard 101: Intro to Computer Keyboards
- Fix It Yourself: Talking to iFixit on Why Repairable Tech Matters
- The Local LLM Your Laptop's Been Waiting For
- Gemma vs Qwen: Which Local AI is Best?
Matthew S. Smith is a prolific tech journalist, critic, product reviewer, and influencer from Portland, Oregon. Over 16 years covering tech he has reviewed thousands of PC laptops, desktops, monitors, and other consumer gadgets. Matthew also hosts Computer Gaming Yesterday, a YouTube channel dedicated to retro PC gaming, and covers the latest artificial intelligence research for IEEE Spectrum.